- 快召唤伙伴们来围观吧
- 微博 QQ QQ空间 贴吧
- 文档嵌入链接
- 复制
- 微信扫一扫分享
- 已成功复制到剪贴板
Percona XtraDB Cluster Webinar
以前从未使用过Percona Xtradb群集?这是给你的网络研讨会!在这45分钟的网络研讨会中,我们将向您介绍一个功能齐全的PerconaXtradb集群。
本次网络研讨会将向您展示如何使用proxysql安装percona xtradb集群,并使用percona监控和管理(PMM)对其进行监控。
我们还将讨论引导、IST、SST、认证、常见故障情况和在线模式更改等主题。
在本次网络研讨会之后,您将有足够的知识使用proxysql建立一个工作的percona xtradb集群,以满足您的高可用性需求。
展开查看详情
1 .Percona XtraDB Cluster Webinar
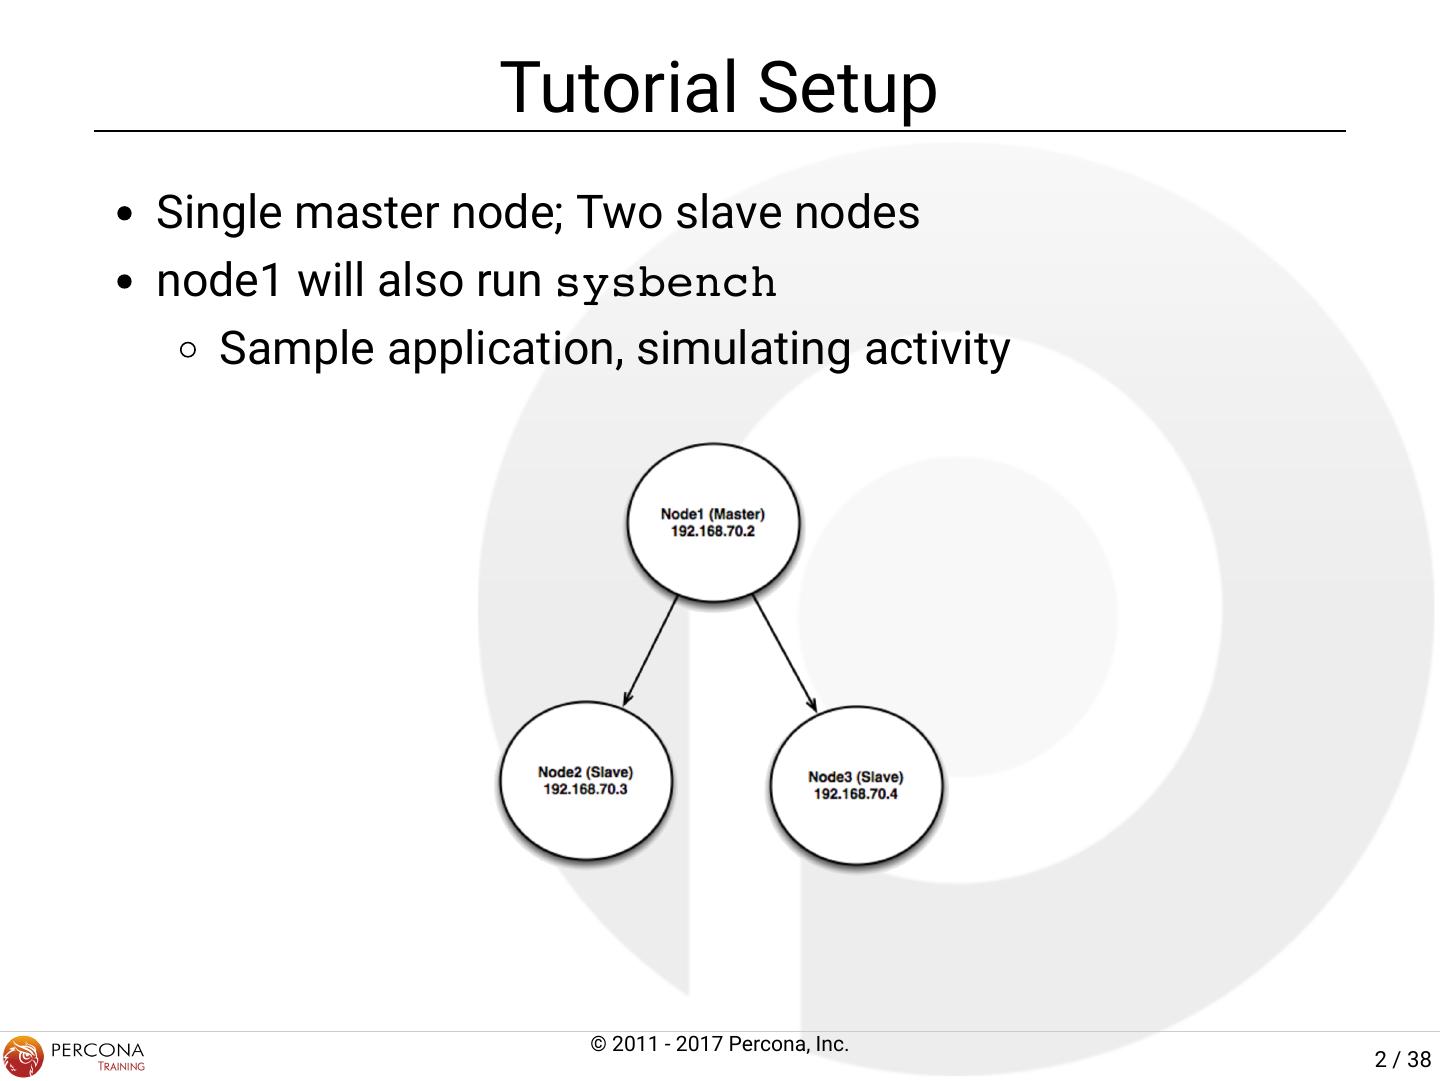
2 . Tutorial Setup Single master node; Two slave nodes node1 will also run sysbench Sample application, simulating activity © 2011 - 2017 Percona, Inc. 2 / 38
3 . Run Sample Application Start the application and verify Use another window for this or use screen node1# run_sysbench_oltp.sh Is replication owing to all the nodes? © 2011 - 2017 Percona, Inc. 3 / 38
4 .XtraDB Cluster Tutorial MIGRATING FROM MASTER/SLAVE © 2011 - 2017 Percona, Inc. 4 / 38
5 . What is Our Plan? We have an application working on node1. We want to migrate our master/slave to a PXC cluster with minimal downtime. We will build a cluster from one slave and then add the other servers to it one at a time. © 2011 - 2017 Percona, Inc. 5 / 38
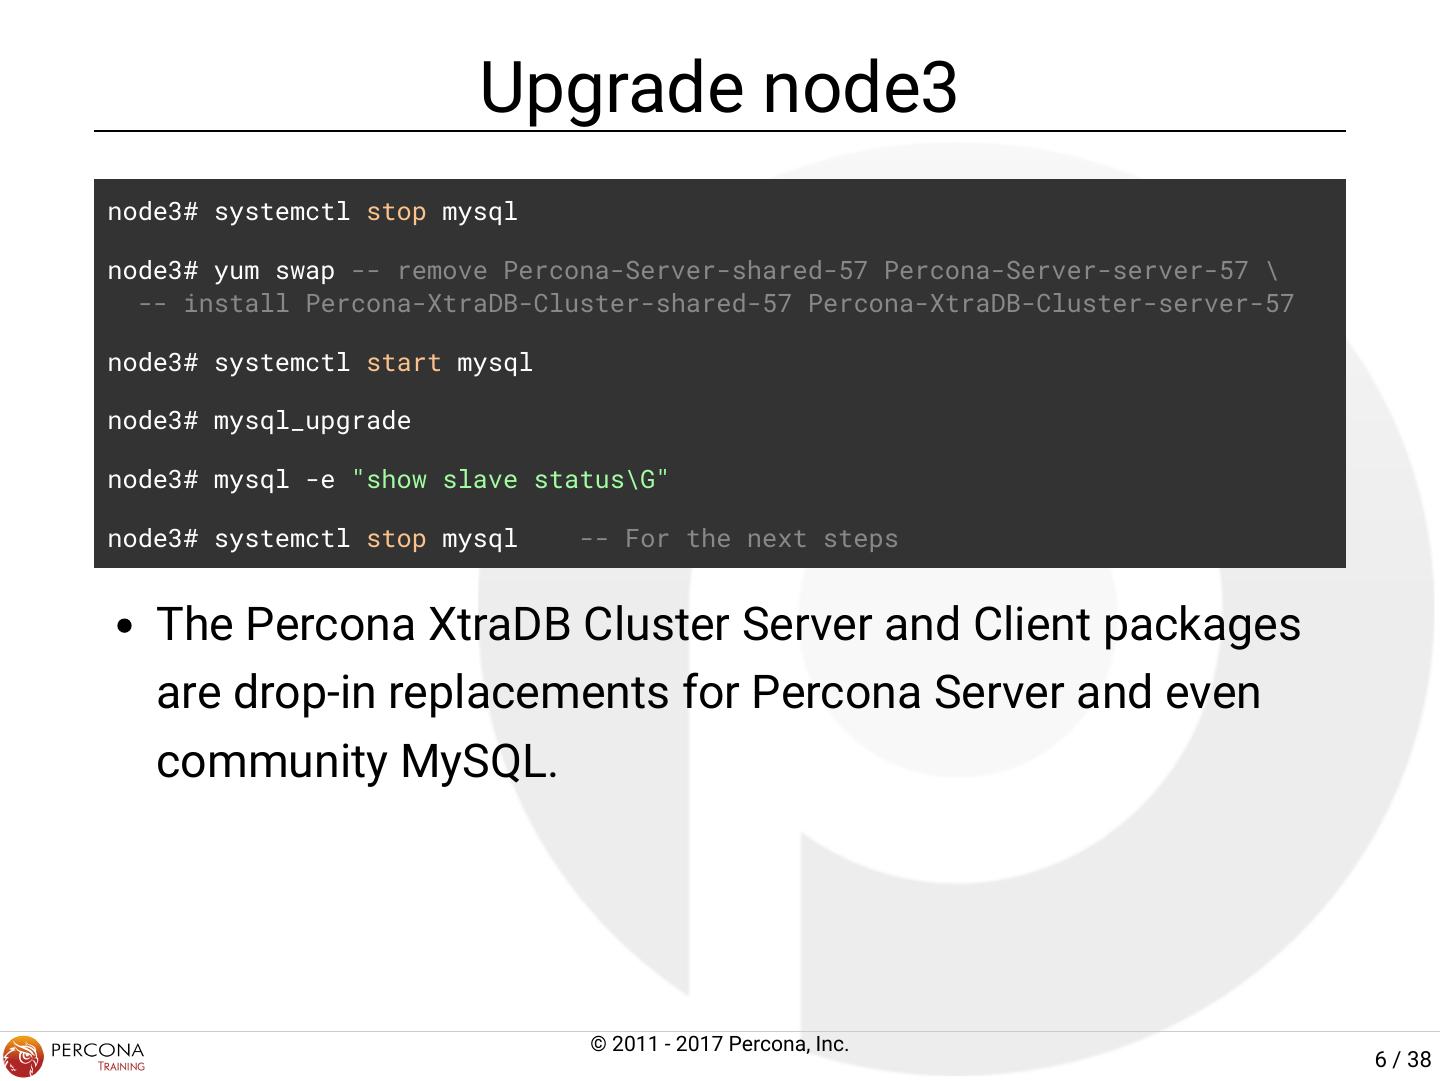
6 . Upgrade node3 node3# systemctl stop mysql node3# yum swap -- remove Percona-Server-shared-57 Percona-Server-server-57 \ -- install Percona-XtraDB-Cluster-shared-57 Percona-XtraDB-Cluster-server-57 node3# systemctl start mysql node3# mysql_upgrade node3# mysql -e "show slave status\G" node3# systemctl stop mysql -- For the next steps The Percona XtraDB Cluster Server and Client packages are drop-in replacements for Percona Server and even community MySQL. © 2011 - 2017 Percona, Inc. 6 / 38
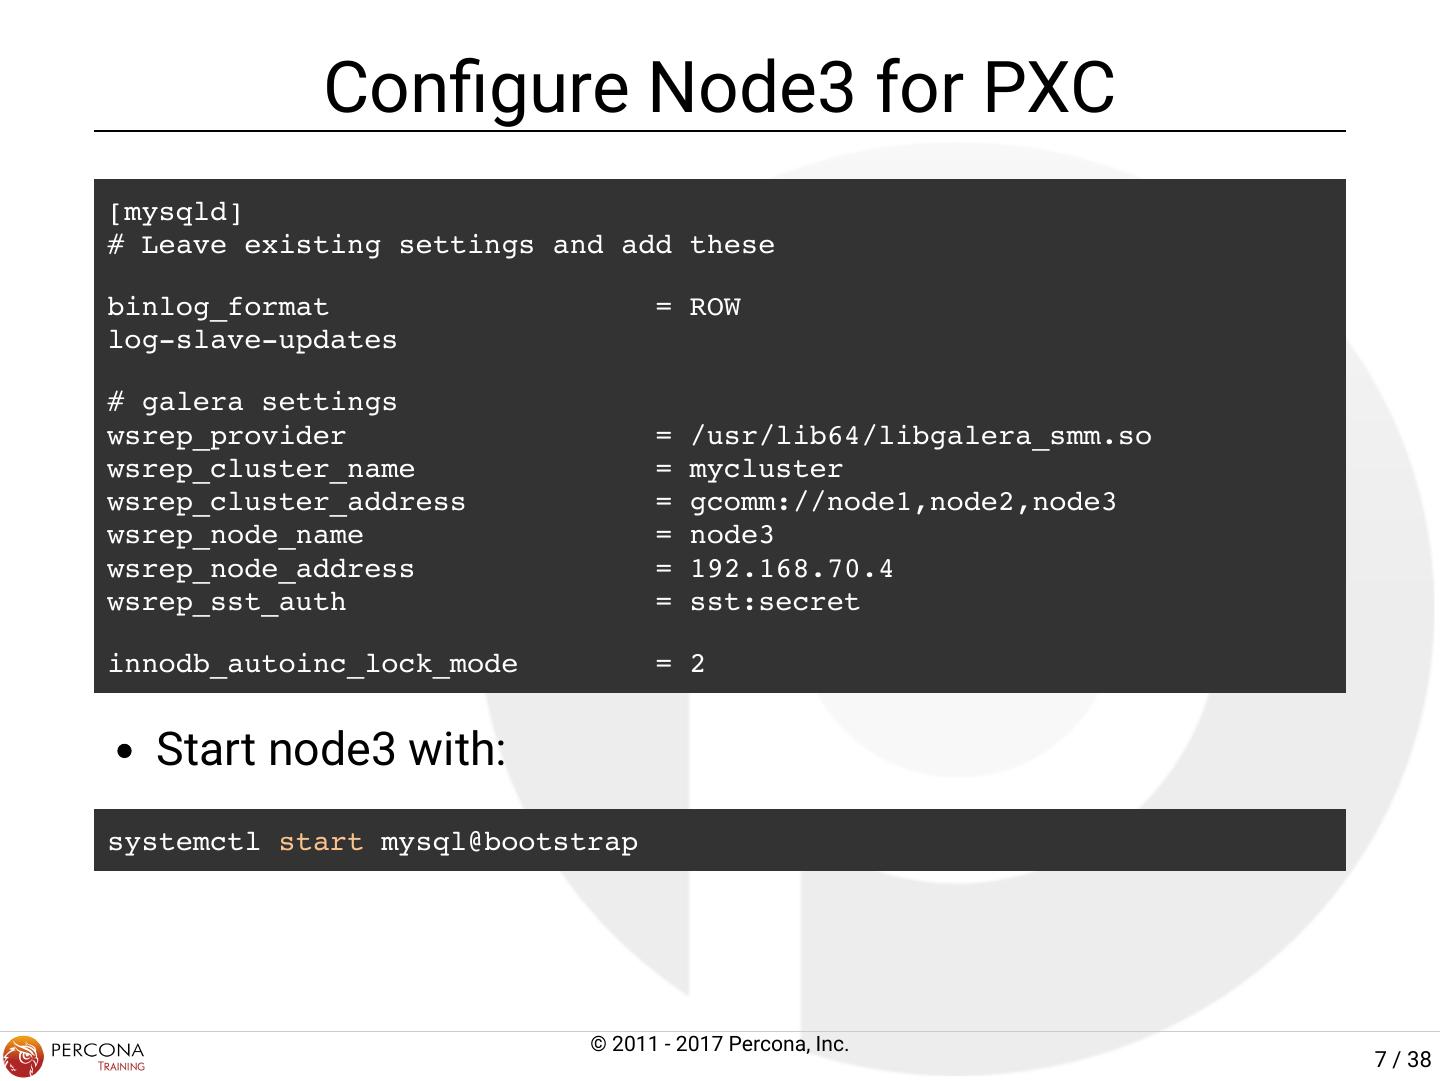
7 . Con gure Node3 for PXC [mysqld] # Leave existing settings and add these binlog_format = ROW log-slave-updates # galera settings wsrep_provider = /usr/lib64/libgalera_smm.so wsrep_cluster_name = mycluster wsrep_cluster_address = gcomm://node1,node2,node3 wsrep_node_name = node3 wsrep_node_address = 192.168.70.4 wsrep_sst_auth = sst:secret innodb_autoinc_lock_mode = 2 Start node3 with: systemctl start mysql@bootstrap © 2011 - 2017 Percona, Inc. 7 / 38
8 . Checking Cluster State Use 'myq_status' to check the state of Galera on node3: node3# /usr/local/bin/myq_status wsrep Replication: node3# mysql -e "show slave status\G" © 2011 - 2017 Percona, Inc. 8 / 38
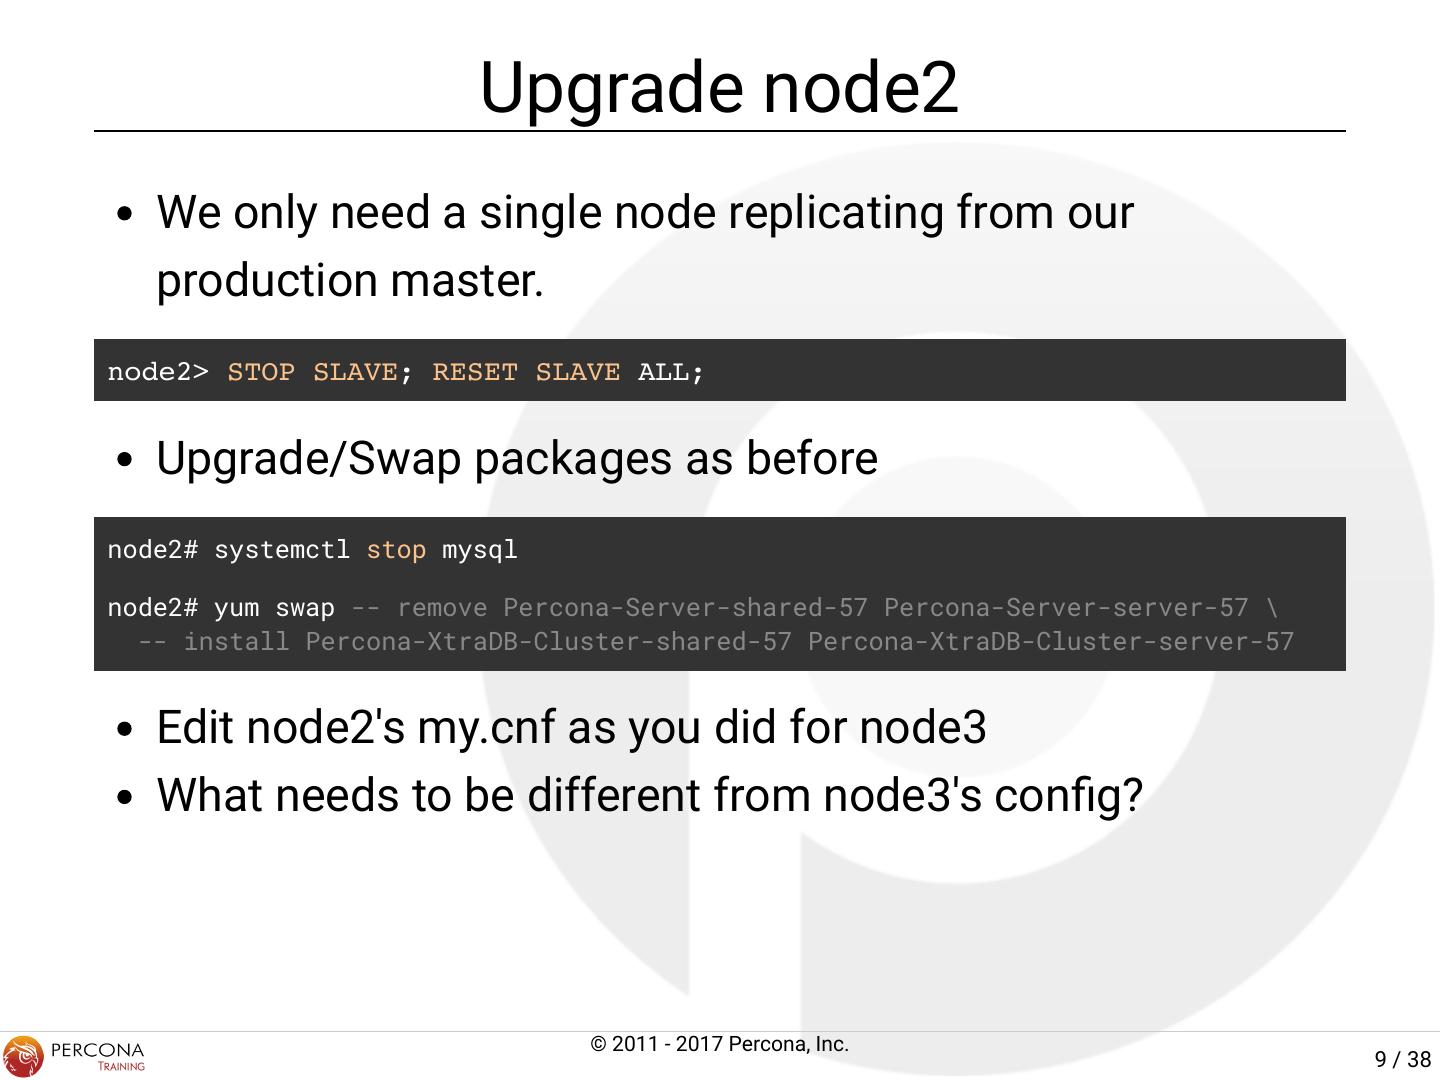
9 . Upgrade node2 We only need a single node replicating from our production master. node2> STOP SLAVE; RESET SLAVE ALL; Upgrade/Swap packages as before node2# systemctl stop mysql node2# yum swap -- remove Percona-Server-shared-57 Percona-Server-server-57 \ -- install Percona-XtraDB-Cluster-shared-57 Percona-XtraDB-Cluster-server-57 Edit node2's my.cnf as you did for node3 What needs to be different from node3's con g? © 2011 - 2017 Percona, Inc. 9 / 38
10 . node2's Con g [mysqld] # Leave existing settings and add these binlog_format = ROW log-slave-updates # galera settings wsrep_provider = /usr/lib64/libgalera_smm.so wsrep_cluster_name = mycluster wsrep_cluster_address = gcomm://node1,node2,node3 wsrep_node_name = node2 wsrep_node_address = 192.168.70.3 wsrep_sst_auth = sst:secret innodb_autoinc_lock_mode = 2 © 2011 - 2017 Percona, Inc. 10 / 38
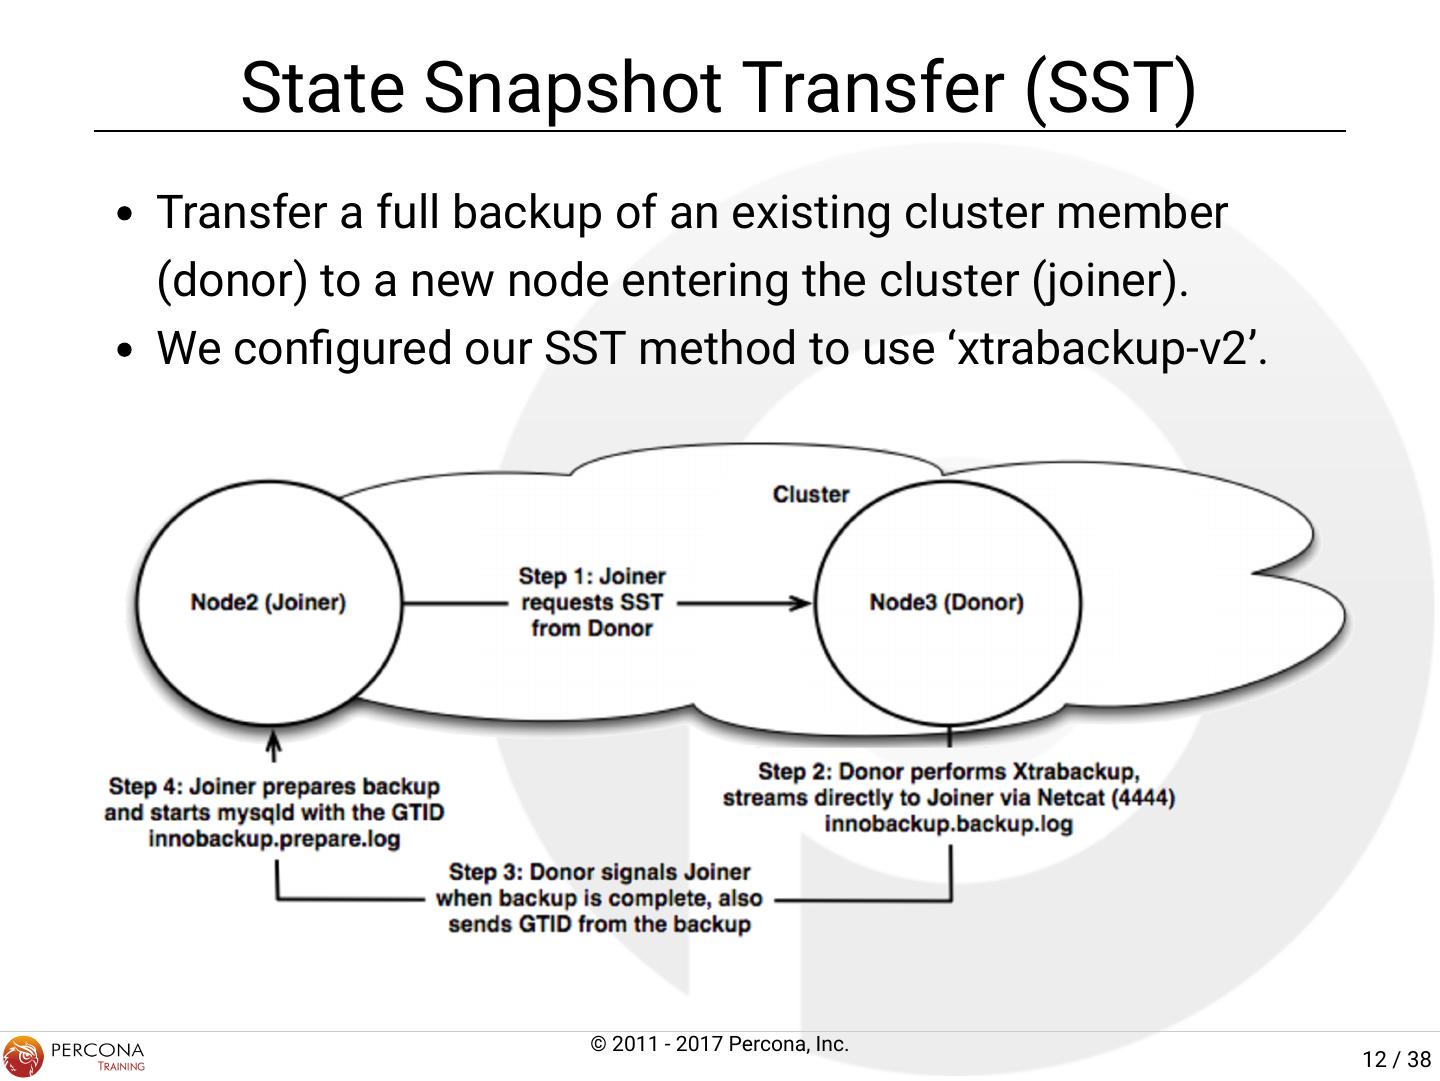
11 . What's going to happen? When node2 is started, what's going to happen? How does node2 get a copy of the dataset? Can it use the existing data it already has? Do we have to bootstrap node2? © 2011 - 2017 Percona, Inc. 11 / 38
12 . State Snapshot Transfer (SST) Transfer a full backup of an existing cluster member (donor) to a new node entering the cluster (joiner). We con gured our SST method to use ‘xtrabackup-v2’. © 2011 - 2017 Percona, Inc. 12 / 38
13 . Additional Xtrabackup SST Setup What about that sst user in your my.cnf? [mysqld] ... wsrep_sst_auth = sst:secret ... User/Grants need to be added for Xtrabackup node3> CREATE USER 'sst'@'localhost' IDENTIFIED BY 'secret'; node3> GRANT PROCESS, RELOAD, LOCK TABLES, REPLICATION CLIENT ON *.* TO 'sst'@'localhost'; The good news is that once you get things gured out the rst time, it's typically very easy to get an SST the rst time on subsequent nodes. © 2011 - 2017 Percona, Inc. 13 / 38
14 . Up and Running node2 Now you can start node2 node2# systemctl start mysql Watch node2's error log for progress node2# tail -f /var/lib/mysql/error.log © 2011 - 2017 Percona, Inc. 14 / 38
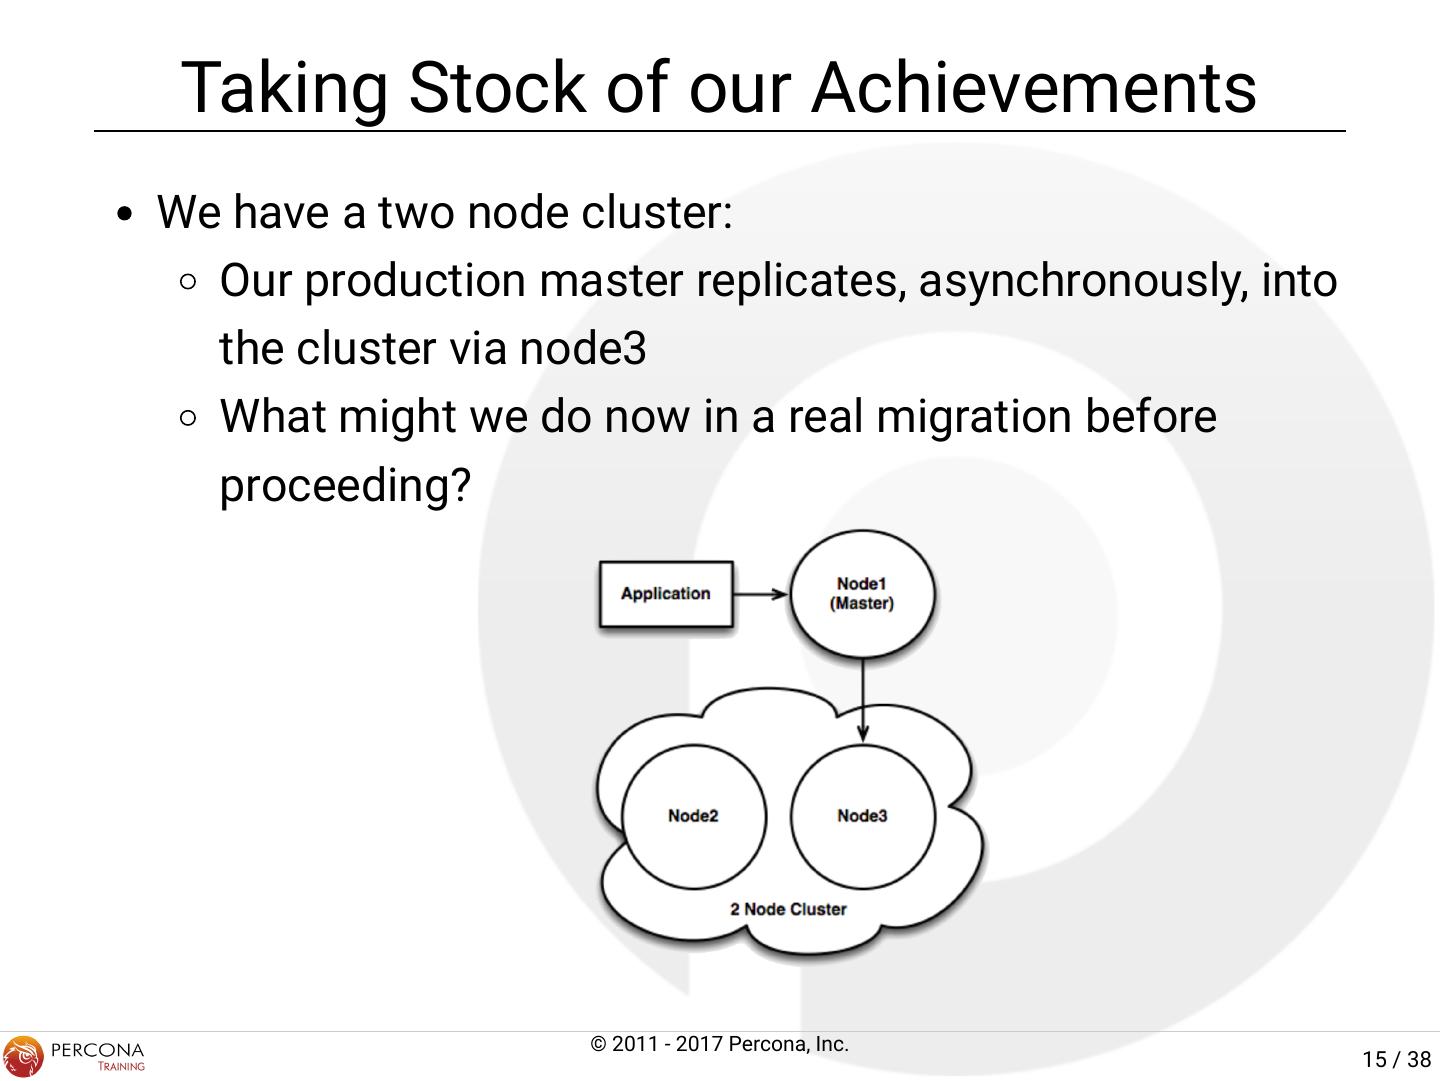
15 . Taking Stock of our Achievements We have a two node cluster: Our production master replicates, asynchronously, into the cluster via node3 What might we do now in a real migration before proceeding? © 2011 - 2017 Percona, Inc. 15 / 38
16 . Finishing the Migration How should we nish the migration? How do we minimize downtime? What do we need to do to ensure there are no data inconsistencies? How might we rollback? © 2011 - 2017 Percona, Inc. 16 / 38
17 . Our Migration Steps Shutdown the application pointing to node1 Shutdown (and RESET) replication on node3 from node1 node3> STOP SLAVE; RESET SLAVE ALL; Startup the application pointing to node3 Rebuild node1 as we did for node2 node1# systemctl stop mysql node1# yum swap -- remove Percona-Server-shared-57 Percona-Server-server-57 \ -- install Percona-XtraDB-Cluster-shared-57 Percona-XtraDB-Cluster-server-57 © 2011 - 2017 Percona, Inc. 17 / 38
18 . node1's Con g [mysqld] # Leave existing settings and add these binlog_format = ROW log-slave-updates # galera settings wsrep_provider = /usr/lib64/libgalera_smm.so wsrep_cluster_name = mycluster wsrep_cluster_address = gcomm://node1,node2,node3 wsrep_node_name = node1 wsrep_node_address = 192.168.70.2 wsrep_sst_auth = sst:secret innodb_autoinc_lock_mode = 2 node1# systemctl start mysql © 2011 - 2017 Percona, Inc. 18 / 38
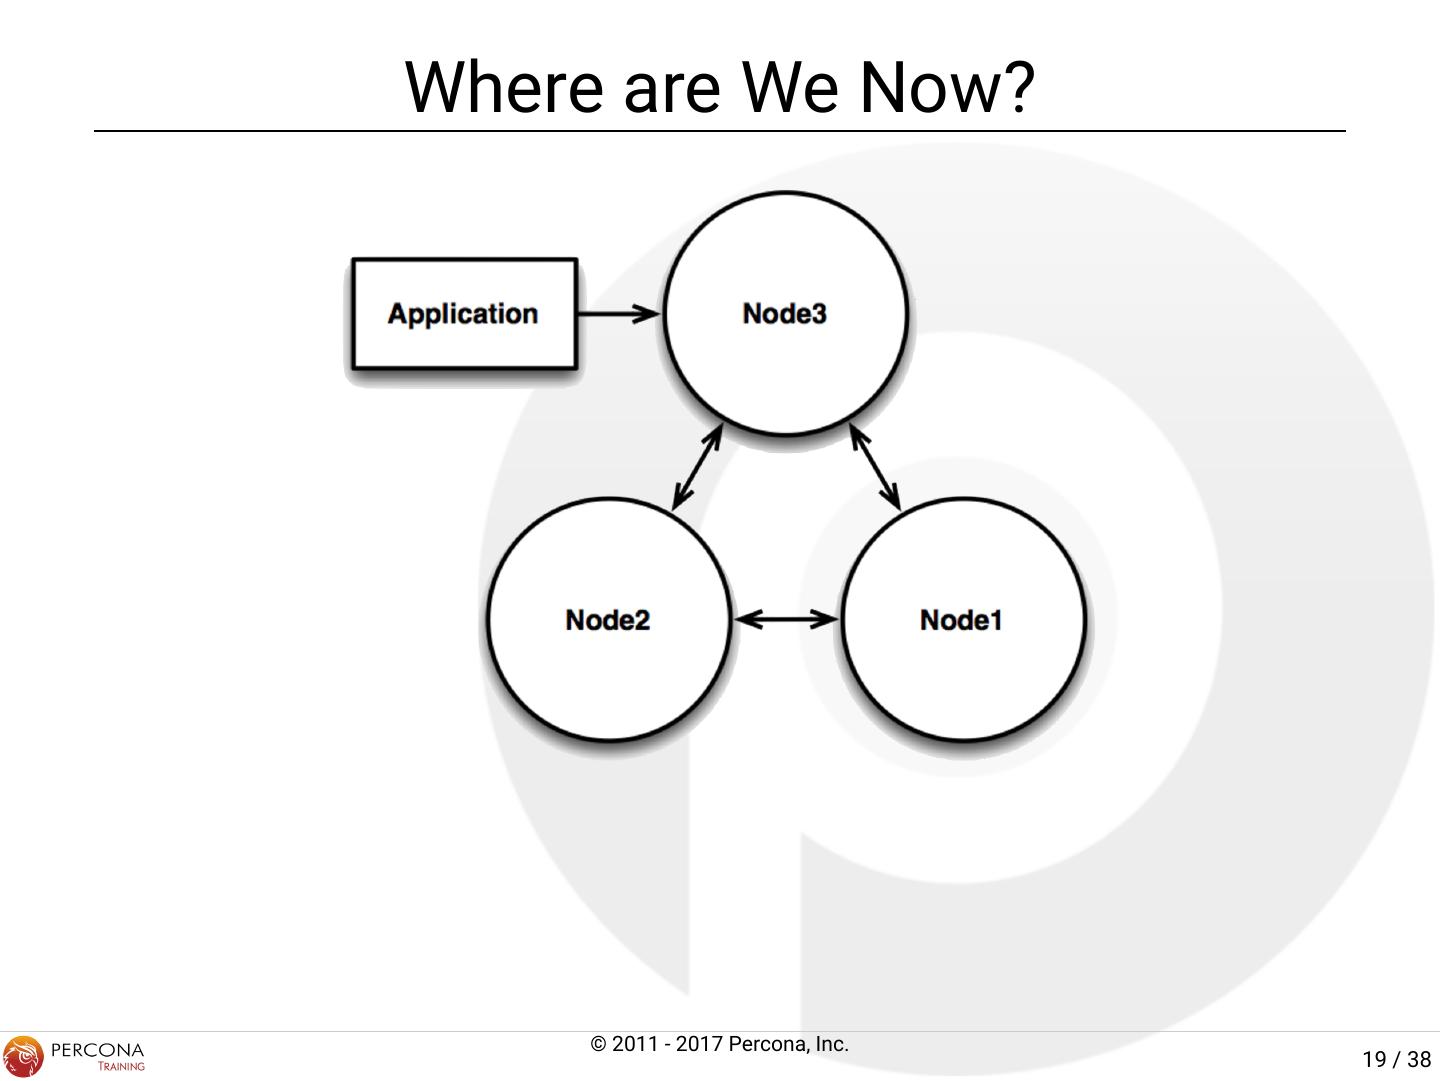
19 .Where are We Now? © 2011 - 2017 Percona, Inc. 19 / 38
20 .XtraDB Cluster Tutorial APPLICATION HIGH AVAILABILITY © 2011 - 2017 Percona, Inc. 20 / 38
21 .ProxySQL Architecture © 2011 - 2017 Percona, Inc. 21 / 38
22 . Setting up ProxySQL Install and Start ProxySQL - Just on node1 node1# yum install proxysql node1# systemctl start proxysql Create monitor user node1 mysql> CREATE USER 'monitor'@'%' IDENTIFIED BY 'monit0r'; © 2011 - 2017 Percona, Inc. 22 / 38
23 . Con guring of ProxySQL Con guration is done via SQL ProxySQL "speaks" MySQL protocol Backended by SQLite Changes are made to "staging" area Must be loaded to "runtime" Must be saved to disk to persist restart node1# mysql -P 6032 -uadmin -padmin -h 127.0.0.1 proxysql> SHOW TABLES; proxysql> UPDATE .. SET .. ; proxysql> LOAD MYSQL [SERVERS|QUERY RULES|USERS|VARIABLES] TO RUNTIME; proxysql> SAVE MYSQL [SERVERS|QUERY RULES|USERS|VARIABLES] TO DISK; © 2011 - 2017 Percona, Inc. 23 / 38
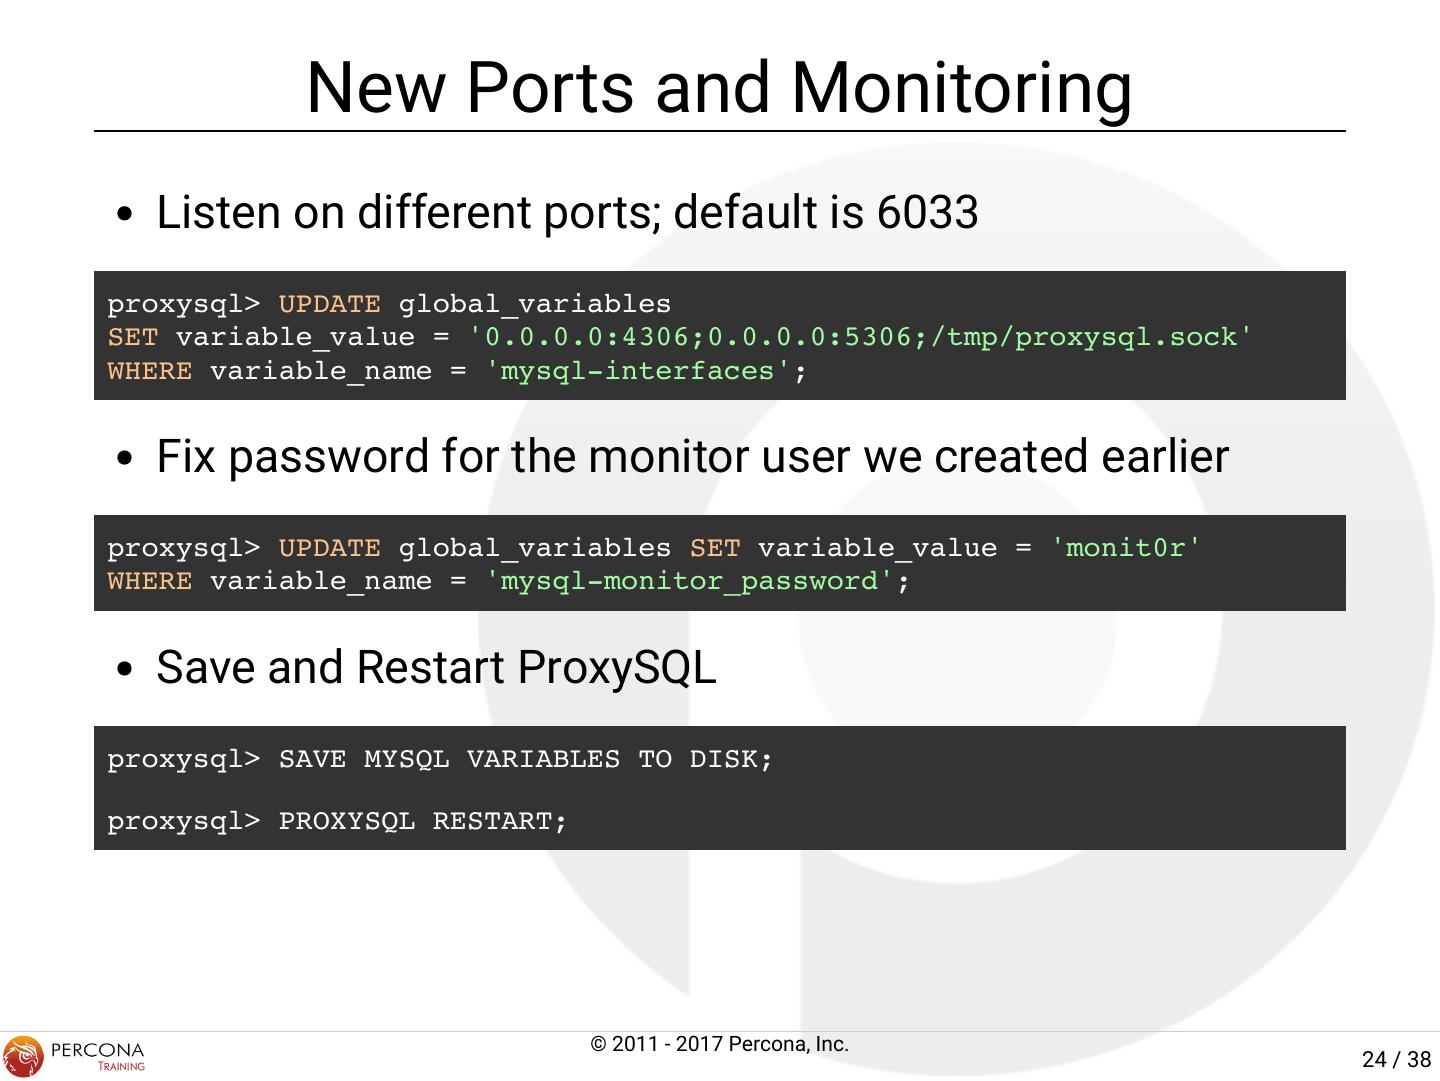
24 . New Ports and Monitoring Listen on different ports; default is 6033 proxysql> UPDATE global_variables SET variable_value = '0.0.0.0:4306;0.0.0.0:5306;/tmp/proxysql.sock' WHERE variable_name = 'mysql-interfaces'; Fix password for the monitor user we created earlier proxysql> UPDATE global_variables SET variable_value = 'monit0r' WHERE variable_name = 'mysql-monitor_password'; Save and Restart ProxySQL proxysql> SAVE MYSQL VARIABLES TO DISK; proxysql> PROXYSQL RESTART; © 2011 - 2017 Percona, Inc. 24 / 38
25 . Add Some Servers De ne our "master" / "slave" pool Add hosts to create hostgroups with weights -- Hostgroup 10 - WRITE proxysql> INSERT INTO mysql_servers (hostgroup_id, hostname, weight, comment) VALUES (10, '192.168.70.2', 1000000, 'WRITE'); -- Hostgroup 20 - READS proxysql> INSERT INTO mysql_servers (hostgroup_id, hostname, weight, comment) VALUES (20, '192.168.70.3', 1000, 'READ'), (20, '192.168.70.4', 1000, 'READ'); © 2011 - 2017 Percona, Inc. 25 / 38
26 . Add a User Add the user with which to connect to backend MySQL hosts. This user will be used both to authenticate against ProxySQL and be used as the account for connections to backend MySQL servers. You can con gure separate users for frontend and backend authentication. proxysql> INSERT INTO mysql_users (username, password, default_hostgroup) VALUES ('sbuser', 'sbpass', 10); MySQL user: node1> CREATE USER 'sbuser'@'%' IDENTIFIED BY 'sbpass'; node1> GRANT ALL ON *.* TO 'sbuser'@'%'; © 2011 - 2017 Percona, Inc. 26 / 38
27 . Some Rules to Follow Add the rules fo Read/Write Splitting. proxysql> insert into mysql_query_rules (rule_id,destination_hostgroup,active,retries,match_digest,apply) values(1,10,1,3,'^SELECT.*FOR UPDATE',1); proxysql> insert into mysql_query_rules (rule_id,destination_hostgroup,active,retries,match_digest,apply) values(2,20,1,3,'^SELECT.*$',1); © 2011 - 2017 Percona, Inc. 27 / 38
28 . Load Everything to Runtime This far, everything has been written to the staging area within ProxySQL. Needs to be loaded to the "runtime" Needs to be saved to disk to persist ProxySQL restart. proxysql> LOAD MYSQL SERVERS TO RUNTIME; LOAD MYSQL QUERY RULES TO RUNTIME; LOAD MYSQL USERS TO RUNTIME; SAVE MYSQL SERVERS TO DISK; SAVE MYSQL QUERY RULES TO DISK; SAVE MYSQL USERS TO DISK; © 2011 - 2017 Percona, Inc. 28 / 38
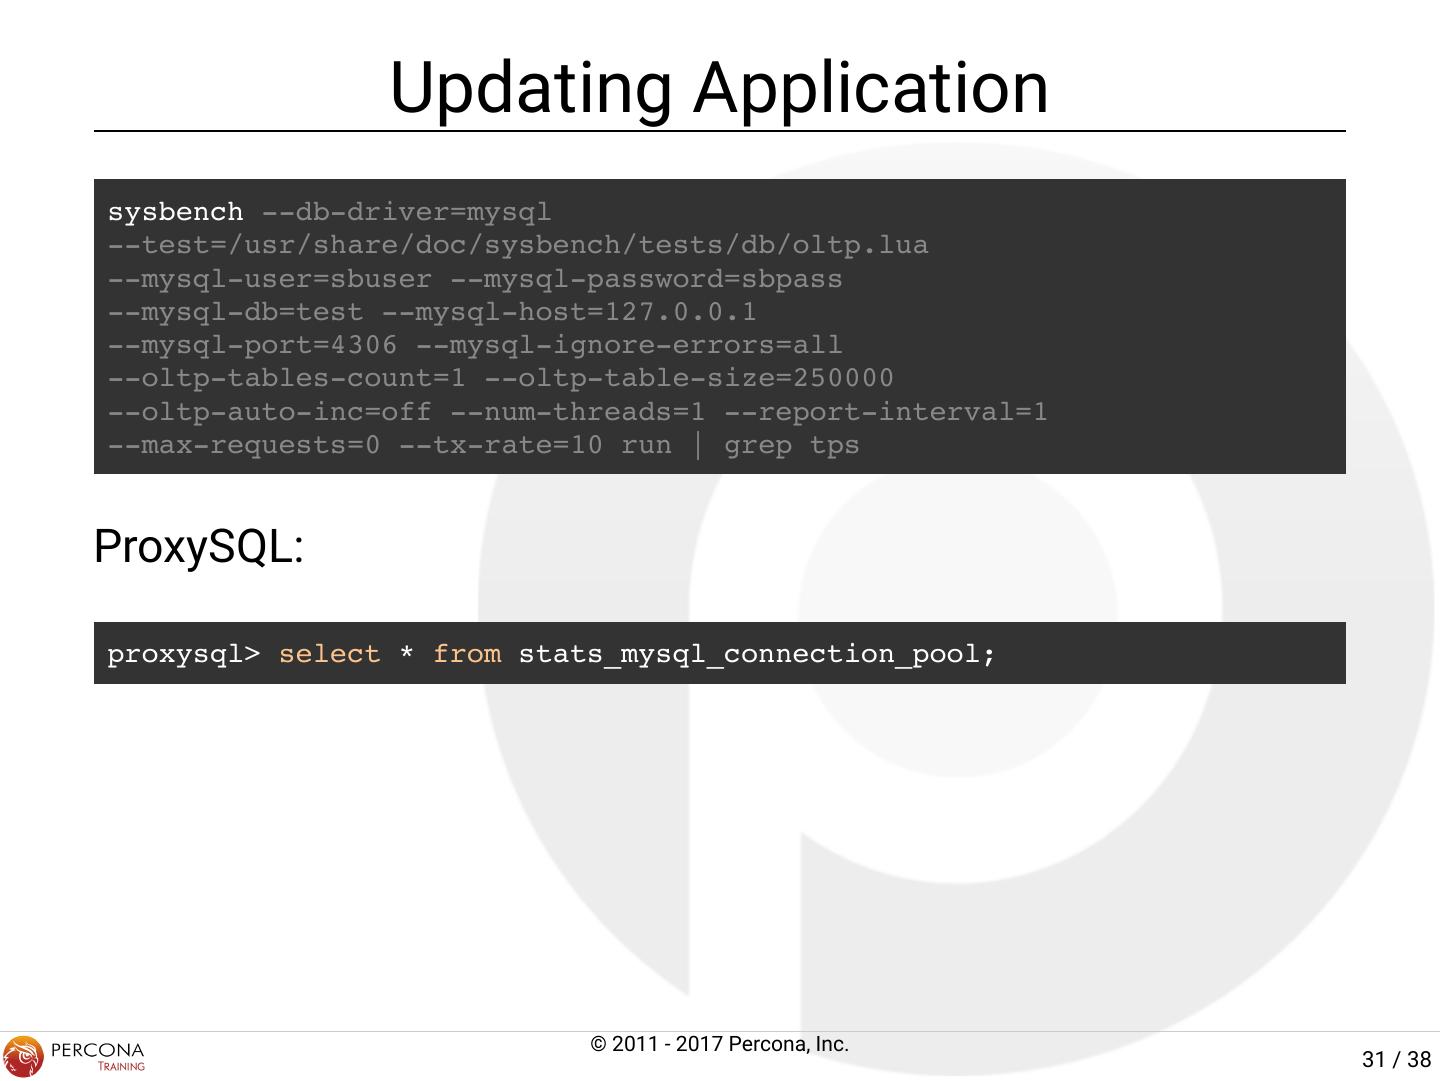
29 . Test Splitting Connection node3# i=0; while [ $i -lt 500 ]; do mysql -BNe "SELECT @@hostname" -usbuser -psbpass -h node1 -P 4306 2>/dev/null; ((i++)); done | sort | uniq -c 245 node2 255 node3 Check ProxySQL Stats node1# mysql -P6032 -ustats -pstats -h 127.0.0.1 proxysql> SELECT * FROM stats_mysql_query_rules; +---------+------+ | rule_id | hits | +---------+------+ | 1 | 0 | | 2 | 500 | +---------+------+ 2 rows in set (0.00 sec) © 2011 - 2017 Percona, Inc. 29 / 38


