- 快召唤伙伴们来围观吧
- 微博 QQ QQ空间 贴吧
- 文档嵌入链接
- 复制
- 微信扫一扫分享
- 已成功复制到剪贴板
Azure Databricks Use Cases
展开查看详情
1 .Three practical use cases with Azure Databricks Solve your big data and AI Challenges
2 .Azure Databricks Three practical use cases with Azure Databricks What this e-book covers and why Who should read this Azure Databricks is a fast, easy, and collaborative Apache® Spark™ based This e-book was written primarily for data scientists, but will analytics platform with one-click setup, streamlined workflows, and the be useful for data engineers and business users interested scalability and security of Microsoft Azure. in building, deploying, and visualizing data models. Rather than describe what Azure Databricks does, we’re going to actually show you: in this e-book, you’ll find three scenarios where Azure Databricks helps data scientists take on specific challenges and what the outcomes look like. We will cover: • A churn analysis model • A movie recommender engine • An intrusion detection demonstration Notebooks explained Notebooks on Azure Databricks are interactive workspaces for exploration and visualization and can be used cooperatively by users across multiple disciplines. With notebooks, you can examine data at scale, build and train models, and share your findings, iterating and collaborating quickly and effectively from experimentation to production. In this e-book, we’ll show how notebooks come to life with example code and results, giving you a clear picture of what it’s like to work in Azure Databricks. 2
3 . Table of contents Three practical use cases with Azure Databricks Getting started............................................................... 4 Intrusion detection system demo..........................22 Churn analysis demo.................................................... 5 Conclusion.....................................................................30 Movie recommendation engine............................. 16
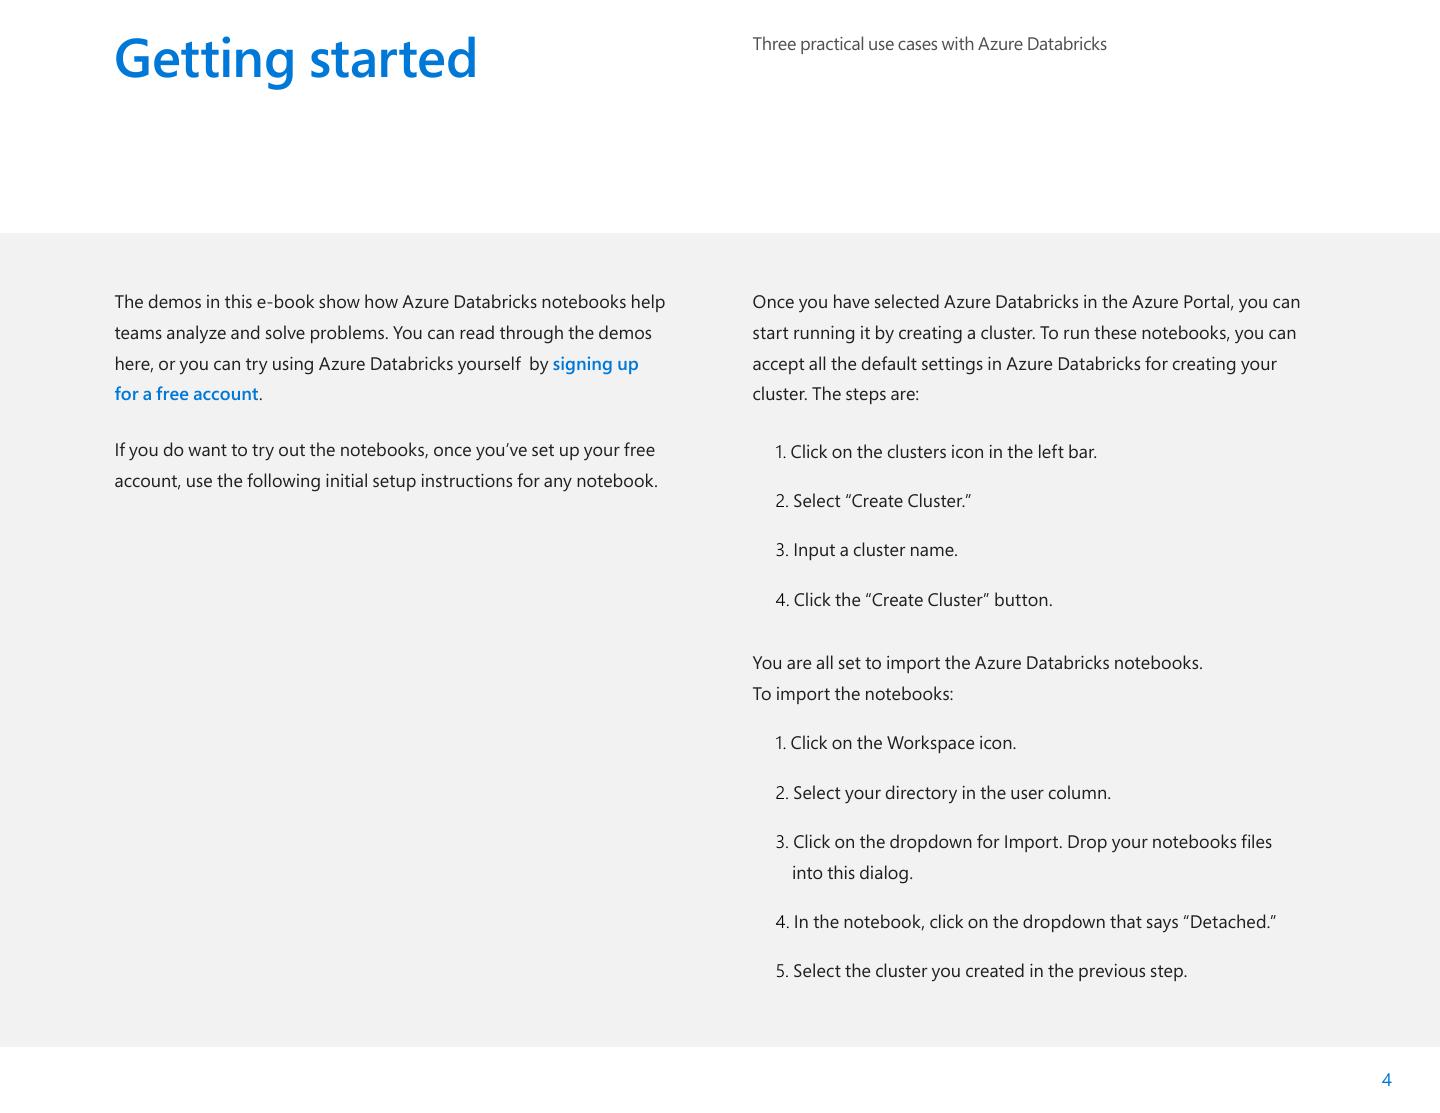
4 .Getting started Three practical use cases with Azure Databricks The demos in this e-book show how Azure Databricks notebooks help Once you have selected Azure Databricks in the Azure Portal, you can teams analyze and solve problems. You can read through the demos start running it by creating a cluster. To run these notebooks, you can here, or you can try using Azure Databricks yourself by signing up accept all the default settings in Azure Databricks for creating your for a free account. cluster. The steps are: If you do want to try out the notebooks, once you’ve set up your free 1. Click on the clusters icon in the left bar. account, use the following initial setup instructions for any notebook. 2. Select “Create Cluster.” 3. Input a cluster name. 4. Click the “Create Cluster” button. You are all set to import the Azure Databricks notebooks. To import the notebooks: 1. Click on the Workspace icon. 2. Select your directory in the user column. 3. Click on the dropdown for Import. Drop your notebooks files into this dialog. 4. In the notebook, click on the dropdown that says “Detached.” 5. Select the cluster you created in the previous step. 4
5 . Three practical use cases with Azure Databricks Notebook 1 Churn analysis demo
6 .Churn analysis demo Three practical use cases with Azure Databricks Notebook 1 Customer Churn also known as customer attrition, customer turnover, or customer defection, is the loss of clients or customers. Predicting and preventing customer churn is vital to a range of businesses. In this notebook we will use a pre-built model on Azure Databricks to analyze customer churn. With this model, we can predict when a customer is going to churn with 90% accuracy, so we can setup a report to show customers that are about to churn, and then provide a remediation strategy such as a special offer to try and prevent them from churning. In this example we are looking at cellular carriers, and the goal is to keep them from jumping to another carrier. This notebook: • Contains functionality that is relevant to Data Scientists, Data Engineers and Business users. • Lends itself to a data driven storytelling approach, that demonstrates how notebooks can be used within Azure Databricks. • Uses a machine learning Gradient boosting algorithm implementation to analyze a Customer Churn dataset. • Illustrates a simple churn analysis workflow. We use Customer Churn dataset from the UCI Machine Learning Repository. 6
7 .Churn analysis demo Three practical use cases with Azure Databricks Notebook 1 Step 1: Ingest Churn Data to Notebook %sh mkdir /tmp/churn We download the UCI dataset hosted at UCI site. wget http://www.sgi.com/tech/mlc/db/churn.data -O /tmp/churn/churn.data wget http://www.sgi.com/tech/mlc/db/churn.test -O /tmp/churn/churn.test From the churn.names metadata file, we can see the meaning --2017-08-25 19:52:36-- http://www.sgi.com/tech/mlc/db/churn.data Resolving www.sgi.com (www.sgi.com)... 192.48.178.134 of the data columns: Connecting to www.sgi.com (www.sgi.com)|192.48.178.134|:80... connected. • state: discrete. HTTP request sent, awaiting response... 200 OK • account length: continuous. Length: 376493 (368K) [text/plain] Saving to: ‘/tmp/churn/churn.data’ • area code: continuous. • phone number: discrete. 0K .......... .......... .......... .......... .......... 13% 131K 2s 50K .......... .......... .......... .......... .......... 27% 650K 1s • international plan: discrete. 100K .......... .......... .......... .......... .......... 40% 336K 1s • voice mail plan: discrete. 150K .......... .......... .......... .......... .......... 54% 672K 1s • number vmail messages: continuous. 200K .......... .......... .......... .......... .......... 67% 57.9M 0s 250K .......... .......... .......... .......... .......... 81% 667K 0s • total day minutes: continuous. 300K .......... .......... .......... .......... .......... 95% 69.0M 0s • total day calls: continuous. 350K .......... ....... 100% 166M=0.8s • total day charge: continuous. 2017-08-25 19:52:37 (485 KB/s) - ‘/tmp/churn/churn.data’ saved • total eve minutes: continuous. [376493/376493] • total eve calls: continuous. --2017-08-25 19:52:37-- http://www.sgi.com/tech/mlc/db/churn.test • total eve charge: continuous. Resolving www.sgi.com (www.sgi.com)... 192.48.178.134 • total night minutes: continuous. Connecting to www.sgi.com (www.sgi.com)|192.48.178.134|:80... connected. HTTP request sent, awaiting response... 200 OK • total night calls: continuous. Length: 188074 (184K) [text/plain] • total night charge: continuous. Saving to: ‘/tmp/churn/churn.test’ • total intl minutes: continuous. 0K .......... .......... .......... .......... .......... 27% 160K 1s • total intl calls: continuous. 50K .......... .......... .......... .......... .......... 54% 329K 0s • total intl charge: continuous. 100K .......... .......... .......... .......... .......... 81% 665K 0s 150K .......... .......... .......... ... 100% 23.2M=0.5s • number customer service calls: continuous. • churned: discrete <- This is the label we wish to predict, 2017-08-25 19:52:37 (340 KB/s) - ‘/tmp/churn/churn.test’ saved [188074/188074] indicating whether or not the customer churned. 7
8 .Churn analysis demo Three practical use cases with Azure Databricks Notebook 1 Mount the data locally. The second step is to create the schema in the Data Frame. %py from pyspark.sql.types import * dbutils.fs.mkdirs(“/mnt/churn”) dbutils.fs.mv(“file:///tmp/churn/churn.data” , “/mnt/churn/churn.data”) # The second step is to create the schema dbutils.fs.mv(“file:///tmp/churn/churn.test” , “/mnt/churn/churn.test”) schema =StructType([ StructField(“state”,StringType(), False), Out[2]: True StructField(“account_length”,DoubleType(), False), StructField(“area_code”,DoubleType(), False), StructField(“phone_number”,StringType(), False), StructField(“international_plan”,StringType(), False), %fs ls /mnt/churn StructField(“voice_mail_plan”,StringType(), False), StructField(“number_vmail_messages”,DoubleType(), False), path name size StructField(“total_day_minutes”,DoubleType(), False), StructField(“total_day_calls”,DoubleType(), False), dbfs:/mnt/churn/churn.data churn.data 376493 StructField(“total_day_charge”,DoubleType(), False), dbfs:/mnt/churn/churn.test churn.test 188074 StructField(“total_eve_minutes”,DoubleType(), False), StructField(“total_eve_calls”,DoubleType(), False), StructField(“total_eve_charge”,DoubleType(), False), StructField(“total_night_minutes”,DoubleType(), False), StructField(“total_night_calls”,DoubleType(), False), StructField(“total_night_charge”,DoubleType(), False), StructField(“total_intl_minutes”,DoubleType(), False), StructField(“total_intl_calls”,DoubleType(), False), StructField(“total_intl_charge”,DoubleType(), False), StructField(“number_customer_service_calls”,DoubleType(), False), StructField(“churned”,StringType(), False) ]) df = (spark.read.option(“delimiter”, “,”) .option(“inferSchema”, “true”) .schema(schema) .csv(“dbfs:/mnt/churn/churn.data”)) 8
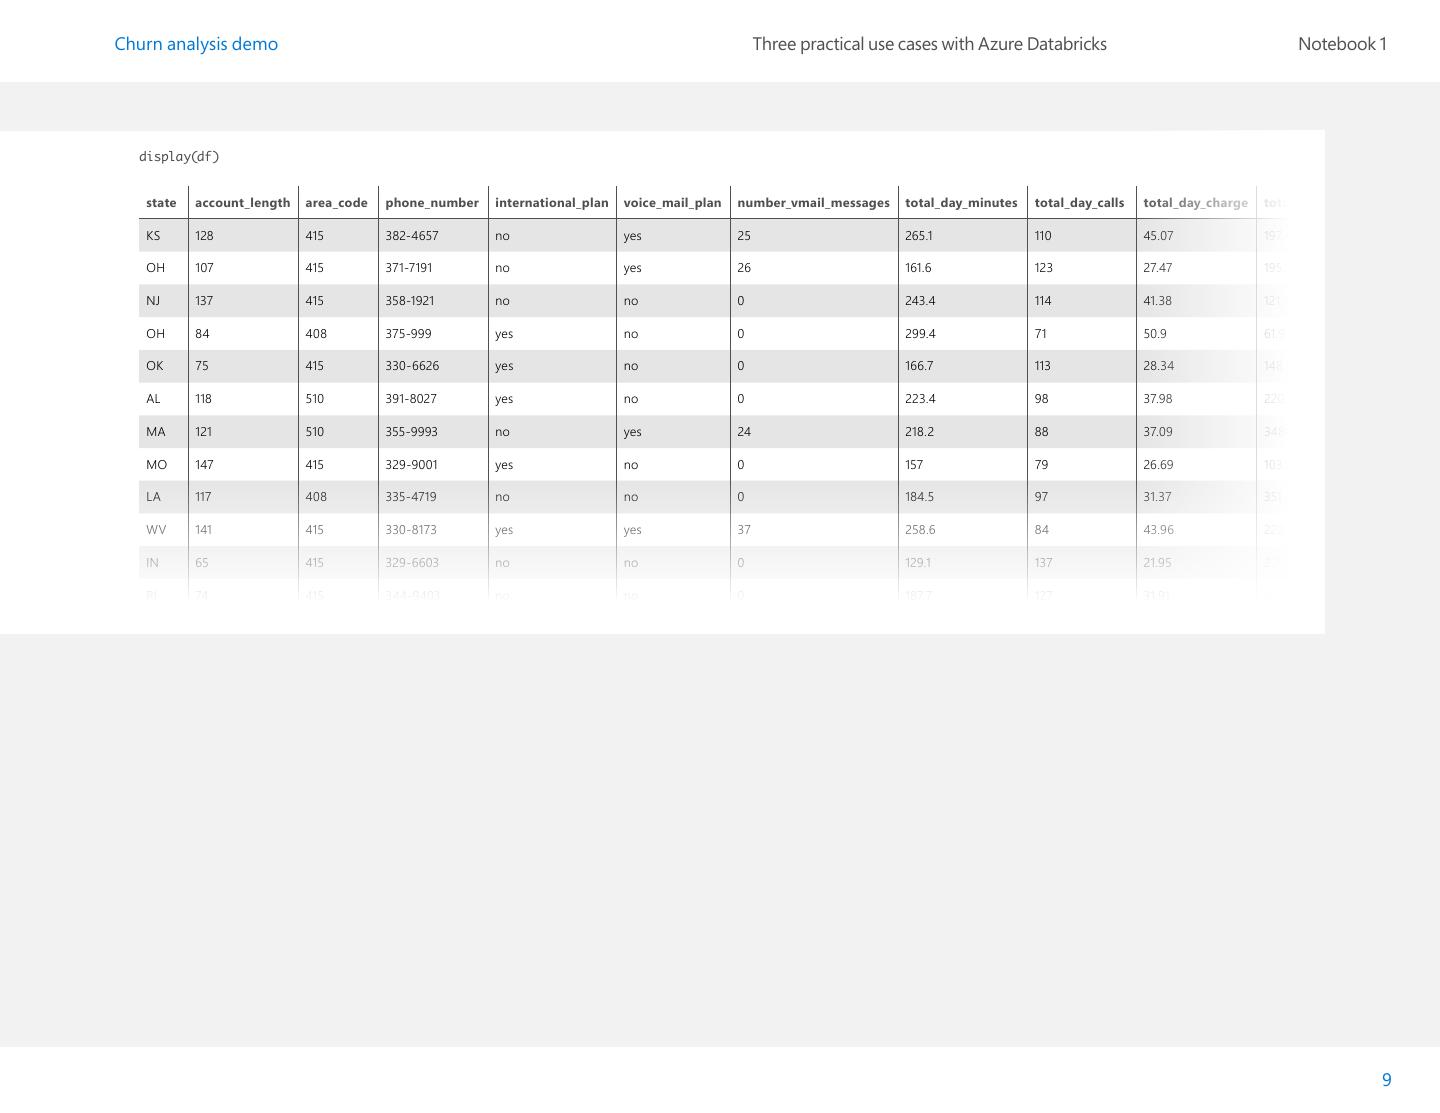
9 .Churn analysis demo Three practical use cases with Azure Databricks Notebook 1 display(df) state account_length area_code phone_number international_plan voice_mail_plan number_vmail_messages total_day_minutes total_day_calls total_day_charge total_eve_minutes KS 128 415 382-4657 no yes 25 265.1 110 45.07 197.4 OH 107 415 371-7191 no yes 26 161.6 123 27.47 195.5 NJ 137 415 358-1921 no no 0 243.4 114 41.38 121.2 OH 84 408 375-999 yes no 0 299.4 71 50.9 61.9 OK 75 415 330-6626 yes no 0 166.7 113 28.34 148.3 AL 118 510 391-8027 yes no 0 223.4 98 37.98 220.6 MA 121 510 355-9993 no yes 24 218.2 88 37.09 348.5 MO 147 415 329-9001 yes no 0 157 79 26.69 103.1 LA 117 408 335-4719 no no 0 184.5 97 31.37 351.6 WV 141 415 330-8173 yes yes 37 258.6 84 43.96 222 IN 65 415 329-6603 no no 0 129.1 137 21.95 228.5 RI 74 415 344-9403 no no 0 187.7 127 31.91 163.4 9
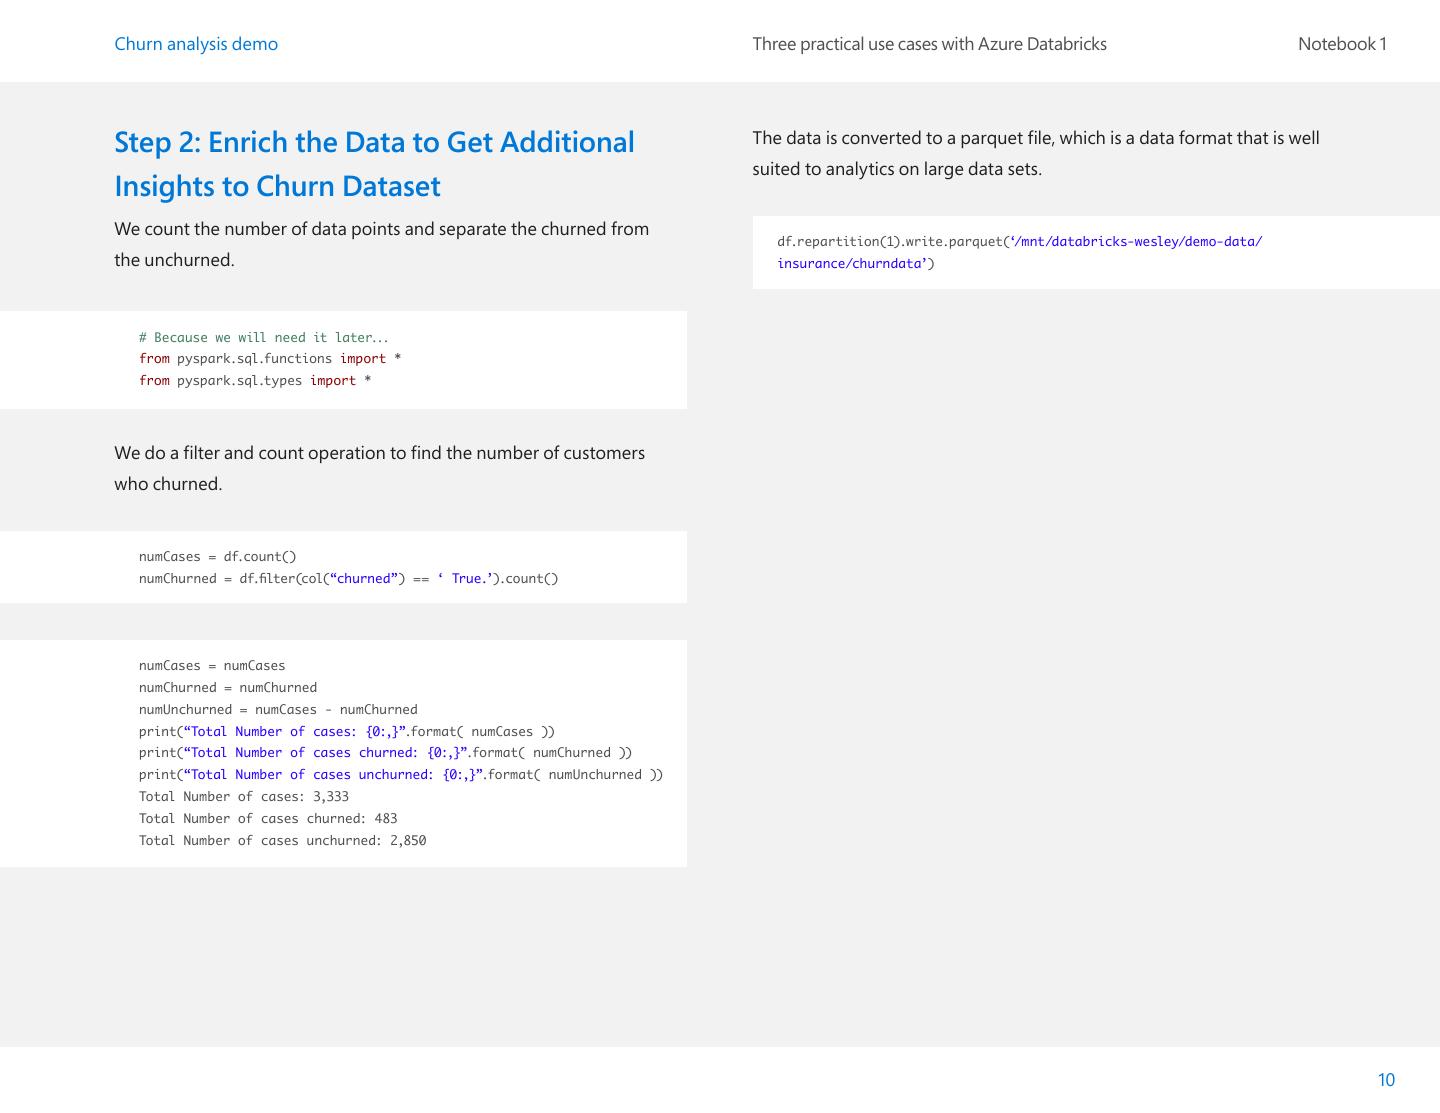
10 .Churn analysis demo Three practical use cases with Azure Databricks Notebook 1 Step 2: Enrich the Data to Get Additional The data is converted to a parquet file, which is a data format that is well suited to analytics on large data sets. Insights to Churn Dataset We count the number of data points and separate the churned from df.repartition(1).write.parquet(‘/mnt/databricks-wesley/demo-data/ the unchurned. insurance/churndata’) # Because we will need it later... from pyspark.sql.functions import * from pyspark.sql.types import * We do a filter and count operation to find the number of customers who churned. numCases = df.count() numChurned = df.filter(col(“churned”) == ‘ True.’).count() numCases = numCases numChurned = numChurned numUnchurned = numCases - numChurned print(“Total Number of cases: {0:,}”.format( numCases )) print(“Total Number of cases churned: {0:,}”.format( numChurned )) print(“Total Number of cases unchurned: {0:,}”.format( numUnchurned )) Total Number of cases: 3,333 Total Number of cases churned: 483 Total Number of cases unchurned: 2,850 10
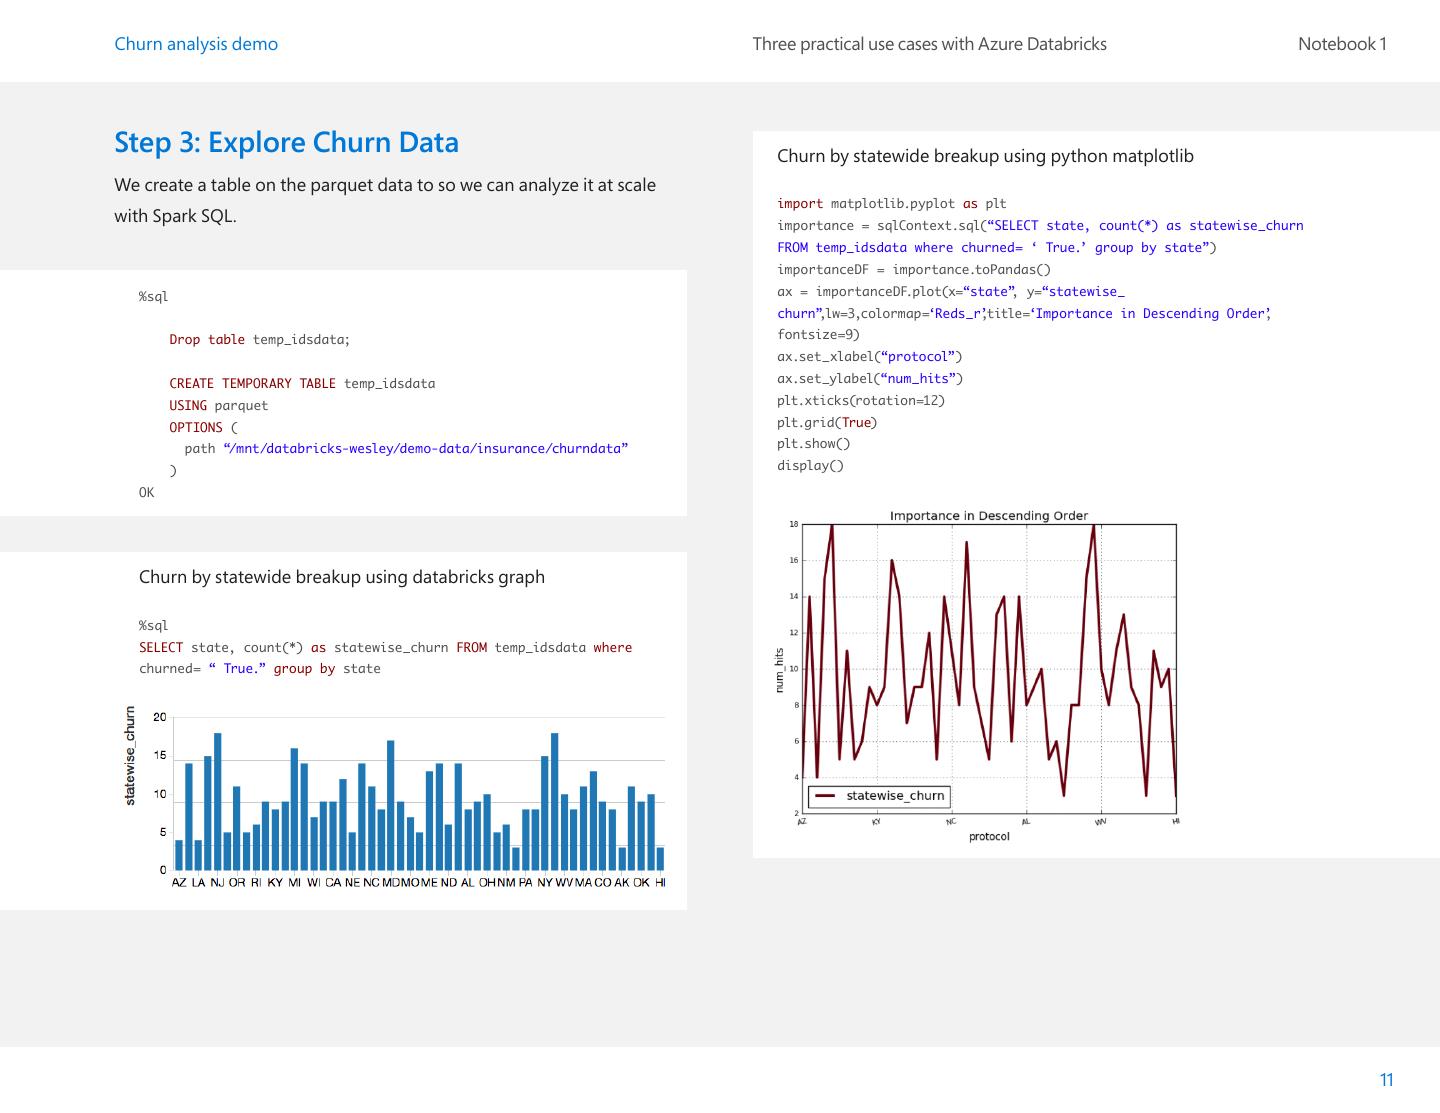
11 .Churn analysis demo Three practical use cases with Azure Databricks Notebook 1 Step 3: Explore Churn Data Churn by statewide breakup using python matplotlib We create a table on the parquet data to so we can analyze it at scale import matplotlib.pyplot as plt with Spark SQL. importance = sqlContext.sql(“SELECT state, count(*) as statewise_churn FROM temp_idsdata where churned= ‘ True.’ group by state”) importanceDF = importance.toPandas() %sql ax = importanceDF.plot(x=“state”, y=“statewise_ churn”,lw=3,colormap=‘Reds_r’ ,title=‘Importance in Descending Order’ , Drop table temp_idsdata; fontsize=9) ax.set_xlabel(“protocol”) CREATE TEMPORARY TABLE temp_idsdata ax.set_ylabel(“num_hits”) USING parquet plt.xticks(rotation=12) OPTIONS ( plt.grid(True) path “/mnt/databricks-wesley/demo-data/insurance/churndata” plt.show() ) display() OK Churn by statewide breakup using databricks graph %sql SELECT state, count(*) as statewise_churn FROM temp_idsdata where churned= “ True.” group by state 11
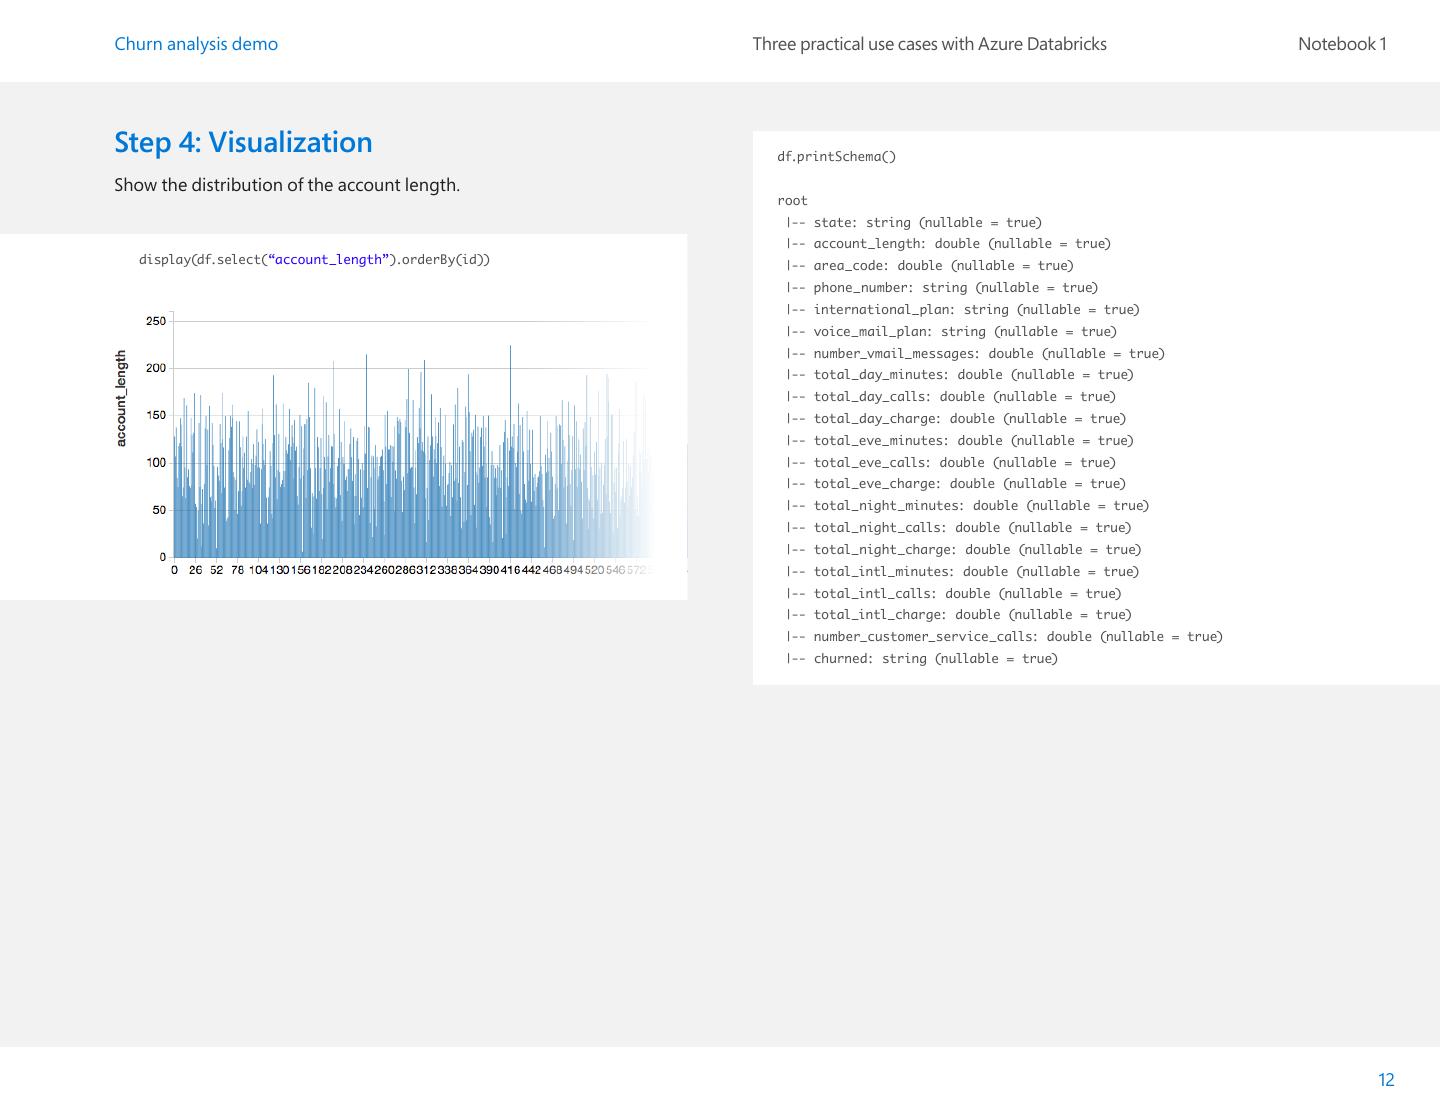
12 .Churn analysis demo Three practical use cases with Azure Databricks Notebook 1 Step 4: Visualization df.printSchema() Show the distribution of the account length. root |-- state: string (nullable = true) |-- account_length: double (nullable = true) display(df.select(“account_length”).orderBy(id)) |-- area_code: double (nullable = true) |-- phone_number: string (nullable = true) |-- international_plan: string (nullable = true) |-- voice_mail_plan: string (nullable = true) |-- number_vmail_messages: double (nullable = true) |-- total_day_minutes: double (nullable = true) |-- total_day_calls: double (nullable = true) |-- total_day_charge: double (nullable = true) |-- total_eve_minutes: double (nullable = true) |-- total_eve_calls: double (nullable = true) |-- total_eve_charge: double (nullable = true) |-- total_night_minutes: double (nullable = true) |-- total_night_calls: double (nullable = true) |-- total_night_charge: double (nullable = true) |-- total_intl_minutes: double (nullable = true) |-- total_intl_calls: double (nullable = true) |-- total_intl_charge: double (nullable = true) |-- number_customer_service_calls: double (nullable = true) |-- churned: string (nullable = true) 12
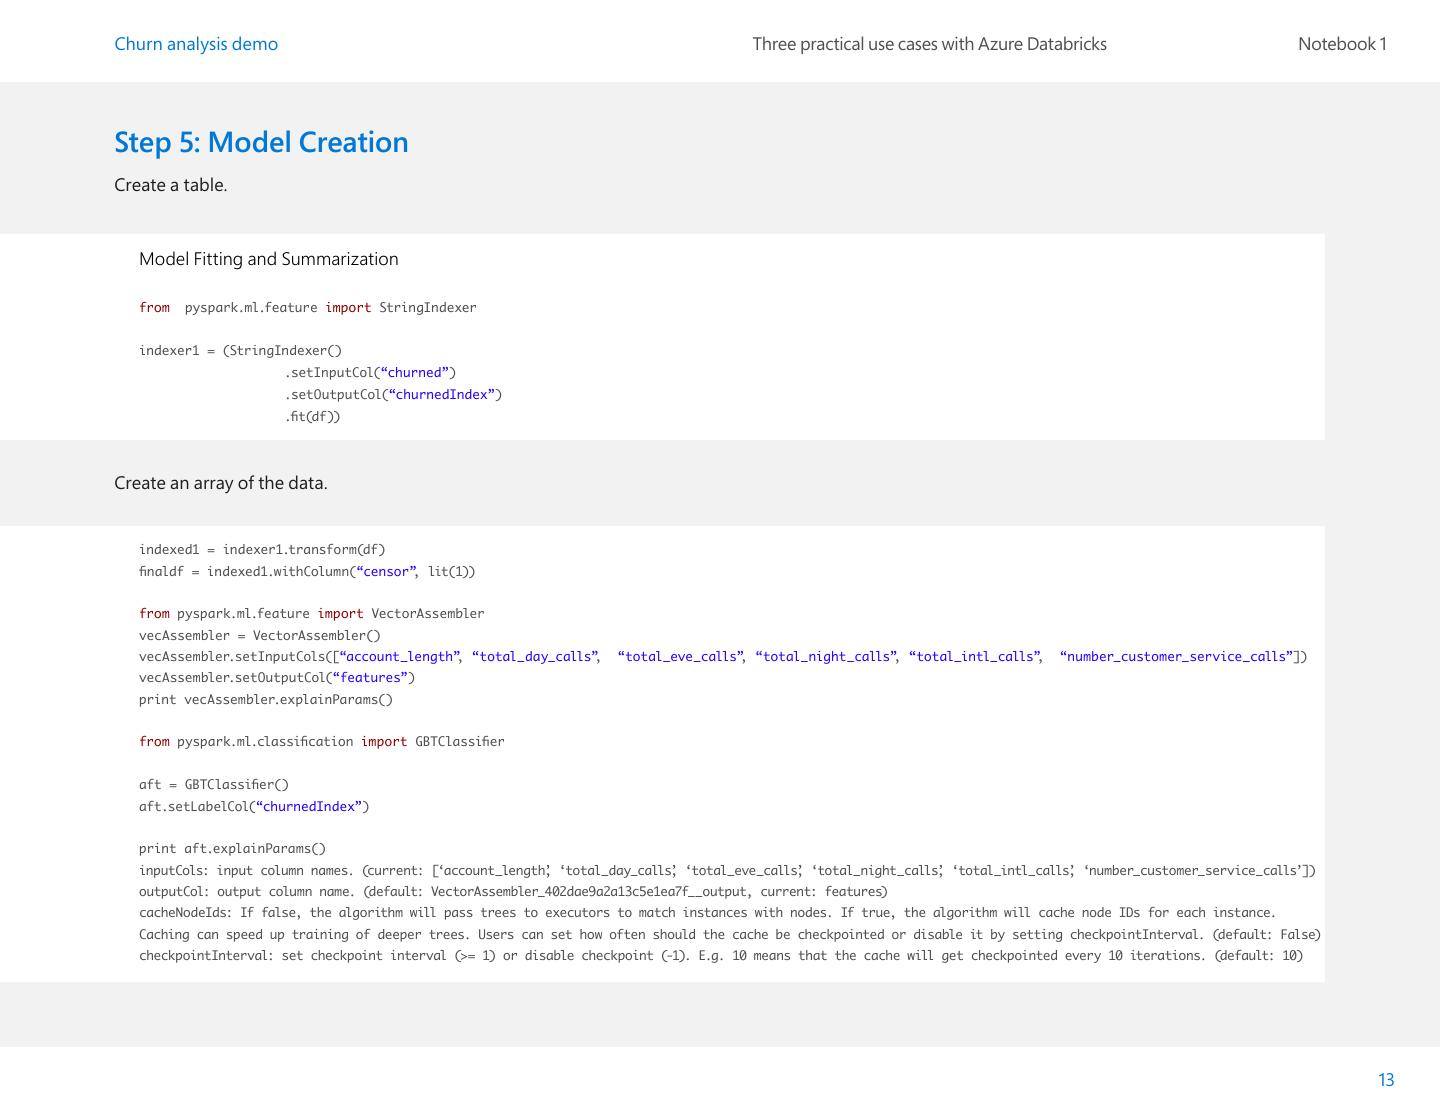
13 .Churn analysis demo Three practical use cases with Azure Databricks Notebook 1 Step 5: Model Creation Create a table. Model Fitting and Summarization from pyspark.ml.feature import StringIndexer indexer1 = (StringIndexer() .setInputCol(“churned”) .setOutputCol(“churnedIndex”) .fit(df)) Create an array of the data. indexed1 = indexer1.transform(df) finaldf = indexed1.withColumn(“censor”, lit(1)) from pyspark.ml.feature import VectorAssembler vecAssembler = VectorAssembler() vecAssembler.setInputCols([“account_length”, “total_day_calls”, “total_eve_calls”, “total_night_calls”, “total_intl_calls”, “number_customer_service_calls”]) vecAssembler.setOutputCol(“features”) print vecAssembler.explainParams() from pyspark.ml.classification import GBTClassifier aft = GBTClassifier() aft.setLabelCol(“churnedIndex”) print aft.explainParams() inputCols: input column names. (current: [‘account_length’ , ‘total_day_calls’ , ‘total_eve_calls’ , ‘total_night_calls’ , ‘total_intl_calls’ , ‘number_customer_service_calls’]) outputCol: output column name. (default: VectorAssembler_402dae9a2a13c5e1ea7f__output, current: features) cacheNodeIds: If false, the algorithm will pass trees to executors to match instances with nodes. If true, the algorithm will cache node IDs for each instance. Caching can speed up training of deeper trees. Users can set how often should the cache be checkpointed or disable it by setting checkpointInterval. (default: False) checkpointInterval: set checkpoint interval (>= 1) or disable checkpoint (-1). E.g. 10 means that the cache will get checkpointed every 10 iterations. (default: 10) 13
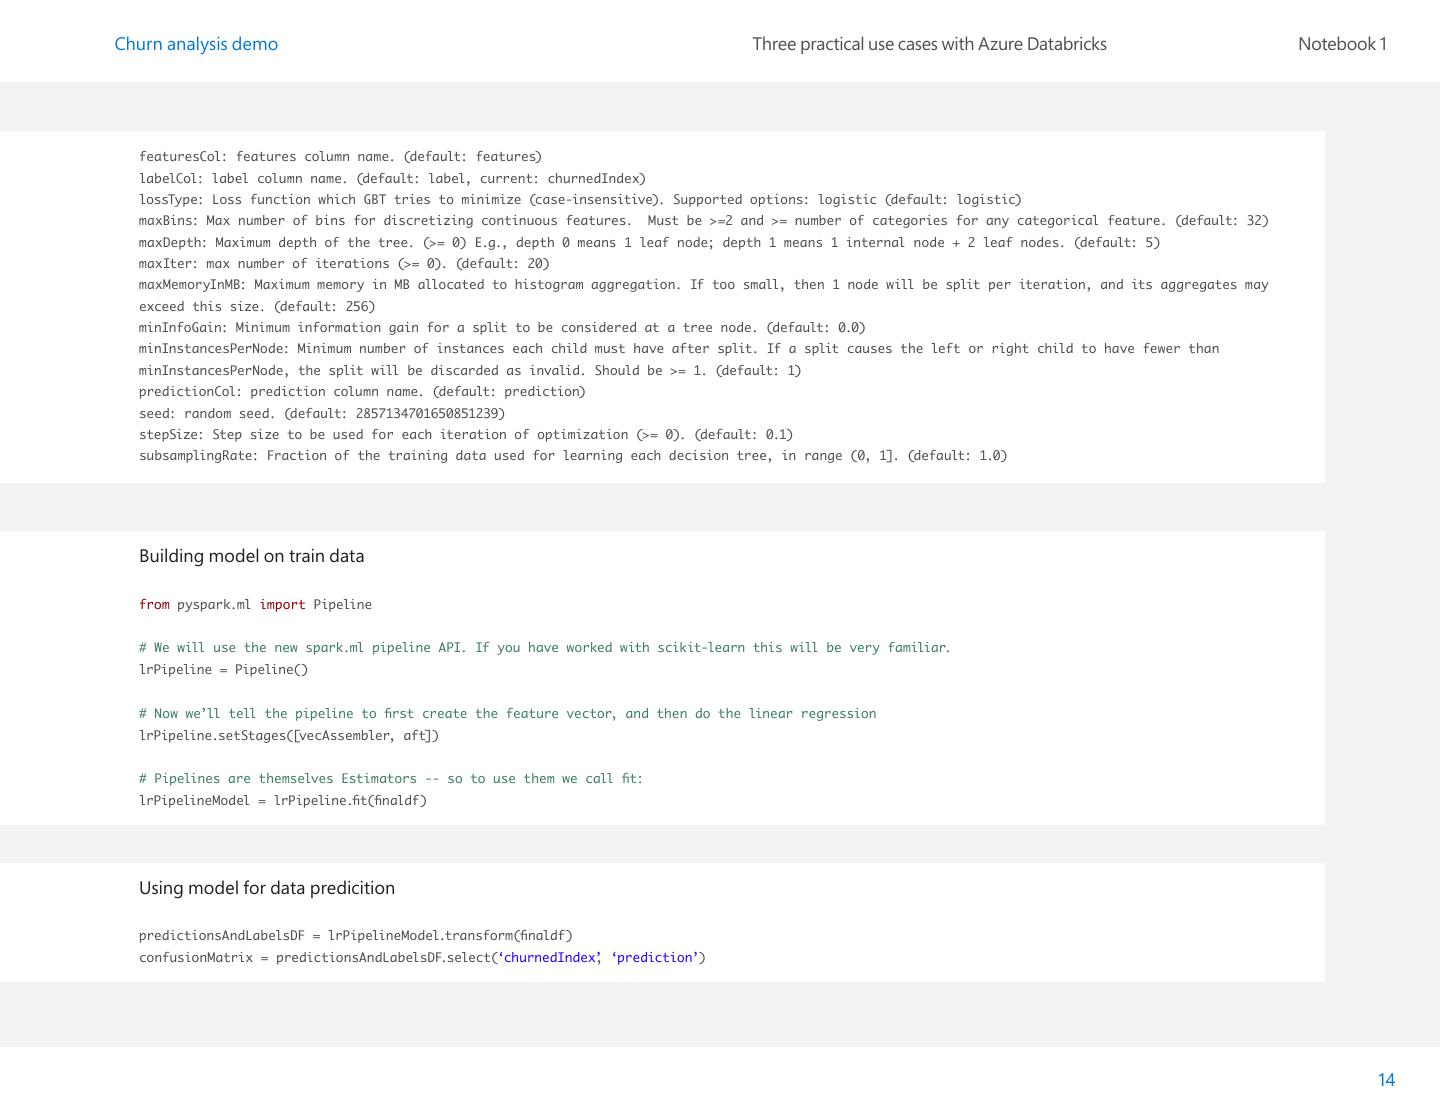
14 .Churn analysis demo Three practical use cases with Azure Databricks Notebook 1 featuresCol: features column name. (default: features) labelCol: label column name. (default: label, current: churnedIndex) lossType: Loss function which GBT tries to minimize (case-insensitive). Supported options: logistic (default: logistic) maxBins: Max number of bins for discretizing continuous features. Must be >=2 and >= number of categories for any categorical feature. (default: 32) maxDepth: Maximum depth of the tree. (>= 0) E.g., depth 0 means 1 leaf node; depth 1 means 1 internal node + 2 leaf nodes. (default: 5) maxIter: max number of iterations (>= 0). (default: 20) maxMemoryInMB: Maximum memory in MB allocated to histogram aggregation. If too small, then 1 node will be split per iteration, and its aggregates may exceed this size. (default: 256) minInfoGain: Minimum information gain for a split to be considered at a tree node. (default: 0.0) minInstancesPerNode: Minimum number of instances each child must have after split. If a split causes the left or right child to have fewer than minInstancesPerNode, the split will be discarded as invalid. Should be >= 1. (default: 1) predictionCol: prediction column name. (default: prediction) seed: random seed. (default: 2857134701650851239) stepSize: Step size to be used for each iteration of optimization (>= 0). (default: 0.1) subsamplingRate: Fraction of the training data used for learning each decision tree, in range (0, 1]. (default: 1.0) Building model on train data from pyspark.ml import Pipeline # We will use the new spark.ml pipeline API. If you have worked with scikit-learn this will be very familiar. lrPipeline = Pipeline() # Now we’ll tell the pipeline to first create the feature vector, and then do the linear regression lrPipeline.setStages([vecAssembler, aft]) # Pipelines are themselves Estimators -- so to use them we call fit: lrPipelineModel = lrPipeline.fit(finaldf) Using model for data predicition predictionsAndLabelsDF = lrPipelineModel.transform(finaldf) confusionMatrix = predictionsAndLabelsDF.select(‘churnedIndex’ , ‘prediction’) 14
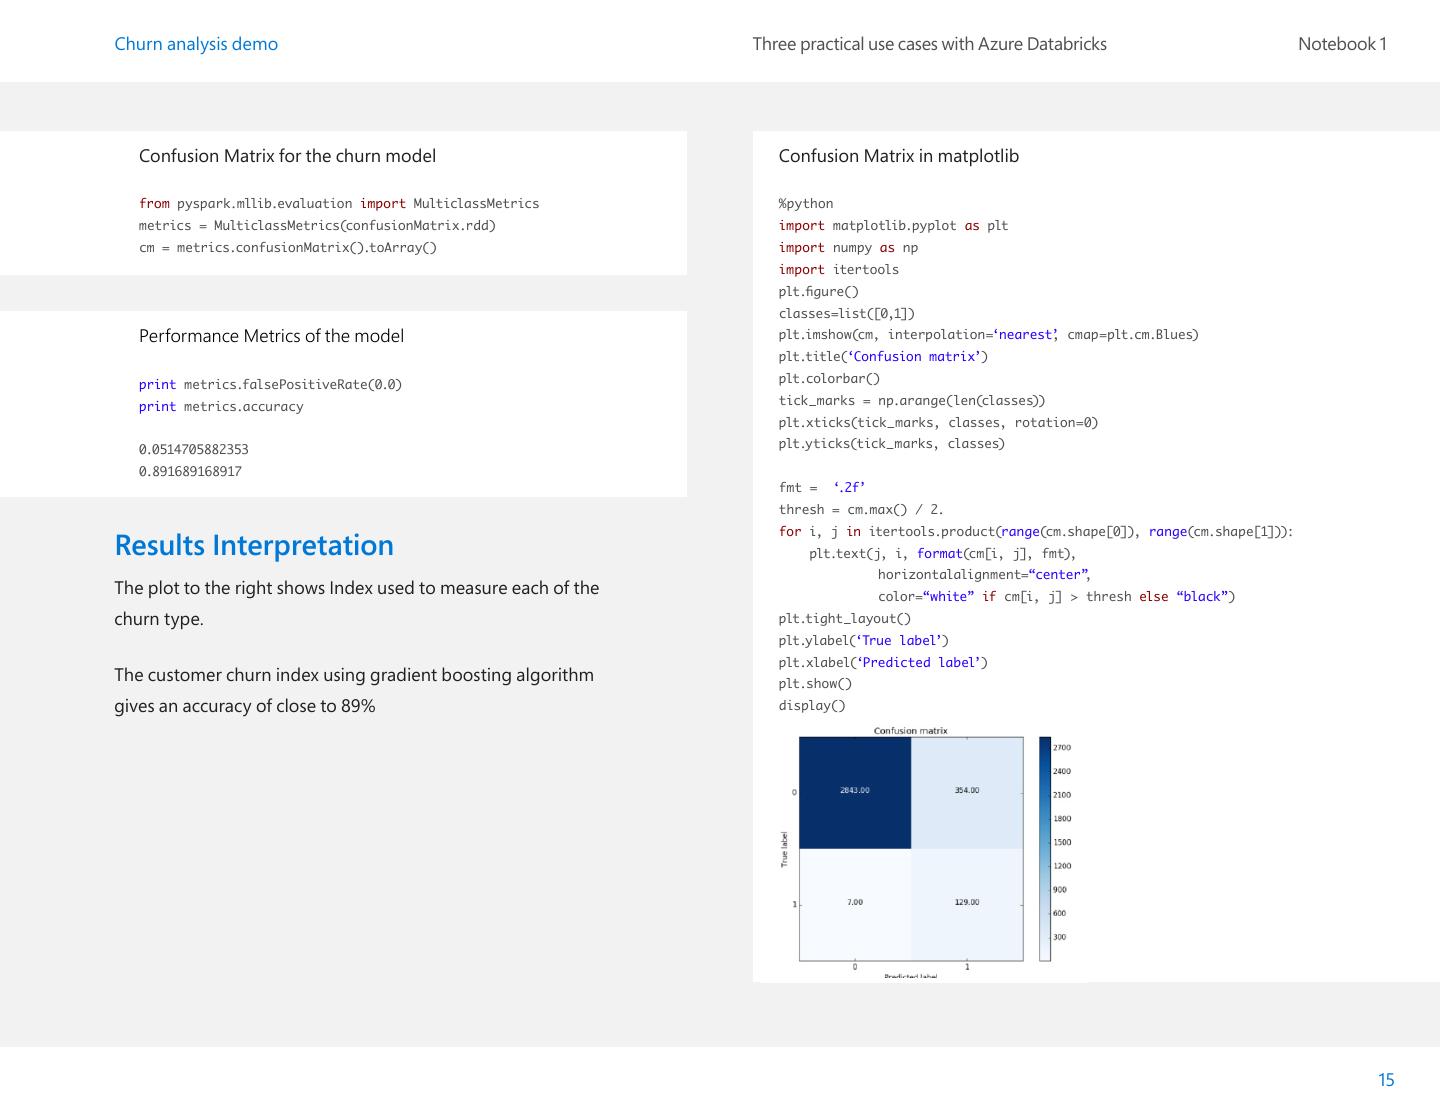
15 .Churn analysis demo Three practical use cases with Azure Databricks Notebook 1 Confusion Matrix for the churn model Confusion Matrix in matplotlib from pyspark.mllib.evaluation import MulticlassMetrics %python metrics = MulticlassMetrics(confusionMatrix.rdd) import matplotlib.pyplot as plt cm = metrics.confusionMatrix().toArray() import numpy as np import itertools plt.figure() classes=list([0,1]) Performance Metrics of the model plt.imshow(cm, interpolation=‘nearest’ , cmap=plt.cm.Blues) plt.title(‘Confusion matrix’) print metrics.falsePositiveRate(0.0) plt.colorbar() print metrics.accuracy tick_marks = np.arange(len(classes)) plt.xticks(tick_marks, classes, rotation=0) 0.0514705882353 plt.yticks(tick_marks, classes) 0.891689168917 fmt = ‘.2f’ thresh = cm.max() / 2. for i, j in itertools.product(range(cm.shape[0]), range(cm.shape[1])): Results Interpretation plt.text(j, i, format(cm[i, j], fmt), horizontalalignment=“center”, The plot to the right shows Index used to measure each of the color=“white” if cm[i, j] > thresh else “black”) churn type. plt.tight_layout() plt.ylabel(‘True label’) plt.xlabel(‘Predicted label’) The customer churn index using gradient boosting algorithm plt.show() gives an accuracy of close to 89% display() 15
16 . Three practical use cases with Azure Databricks Notebook 2 Movie recommendation engine
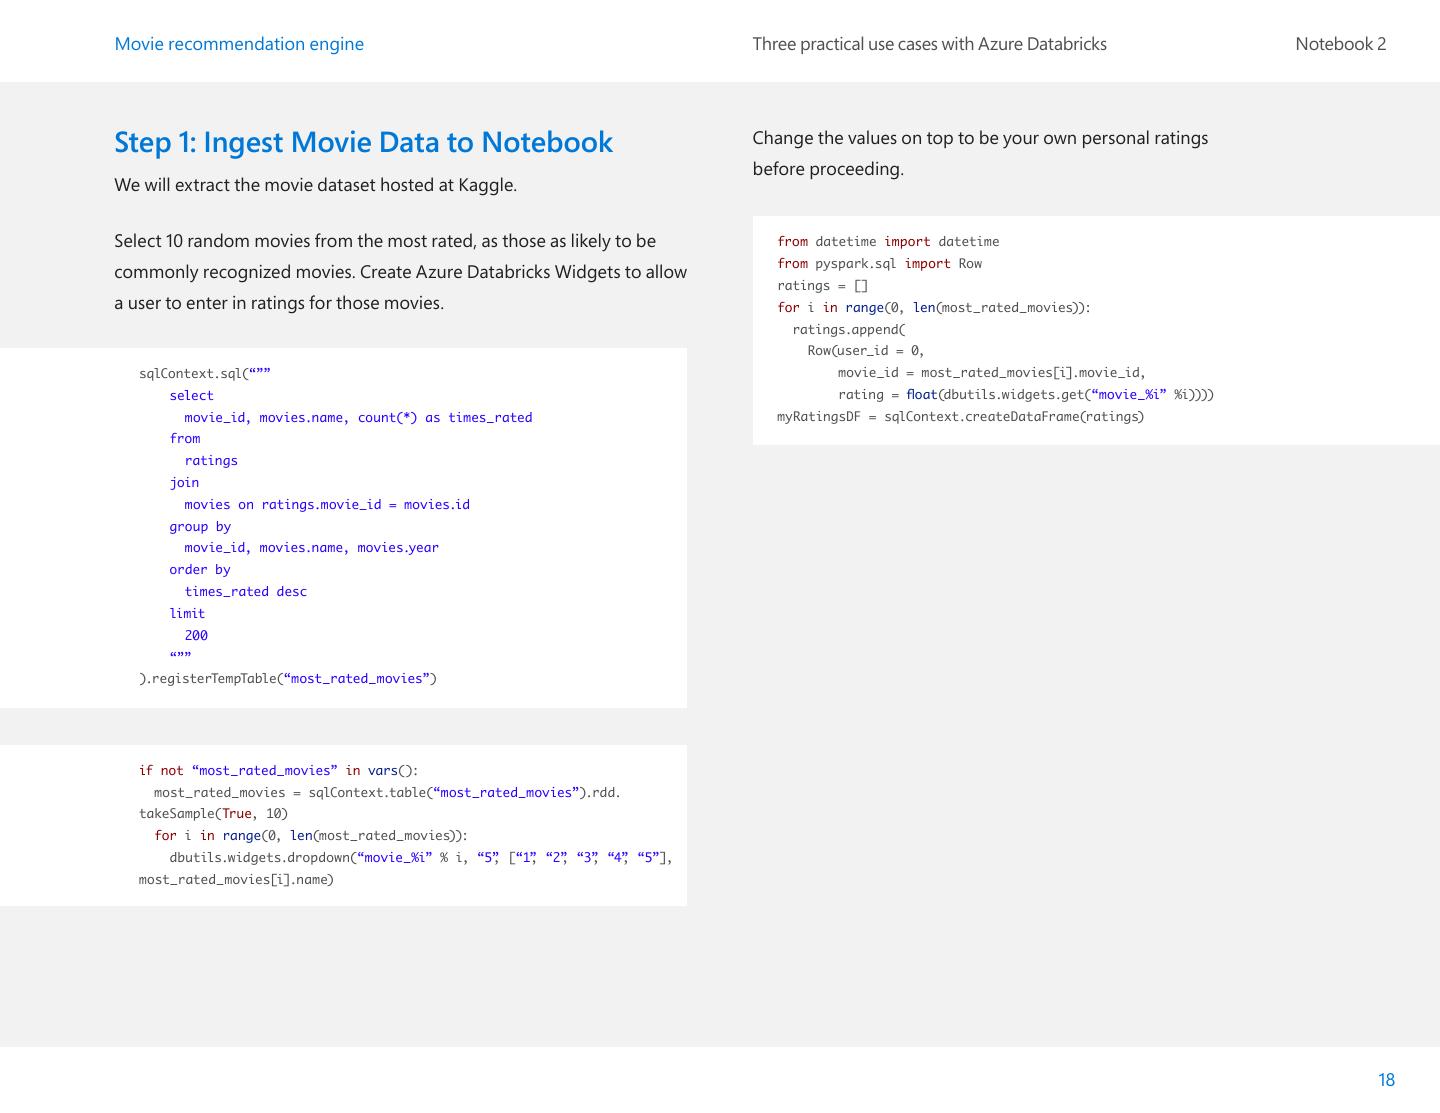
17 .Movie recommendation Three practical use cases with Azure Databricks Notebook 2 engine Recommendation engines are used across many industries, from external use on retail sites, to internal use on employee sites. A recommendation engine delivers plans to end users based on points that matter to them. This demonstration is a simple example of a consumer using a movie website to select a movie to watch. Recommendation engines look at historical data on what people have selected, and then predict the selection the user would make. This movie recommendation engine notebook: • Is built on the Azure Databricks platform and uses a machine learning ALS recommendation algorithm to generate recommendations on movie choices. • Demonstrates a movie recommendation analysis workflow, using movie data from the Kaggle Dataset. • Provides one place to create the entire analytical application, allowing users to collaborate with other participants. • Allows users to see ongoing accuracy that might drive improvements. 17
18 .Movie recommendation engine Three practical use cases with Azure Databricks Notebook 2 Step 1: Ingest Movie Data to Notebook Change the values on top to be your own personal ratings before proceeding. We will extract the movie dataset hosted at Kaggle. Select 10 random movies from the most rated, as those as likely to be from datetime import datetime from pyspark.sql import Row commonly recognized movies. Create Azure Databricks Widgets to allow ratings = [] a user to enter in ratings for those movies. for i in range(0, len(most_rated_movies)): ratings.append( Row(user_id = 0, sqlContext.sql(“”” movie_id = most_rated_movies[i].movie_id, select rating = float(dbutils.widgets.get(“movie_%i” %i)))) movie_id, movies.name, count(*) as times_rated myRatingsDF = sqlContext.createDataFrame(ratings) from ratings join movies on ratings.movie_id = movies.id group by movie_id, movies.name, movies.year order by times_rated desc limit 200 “”” ).registerTempTable(“most_rated_movies”) if not “most_rated_movies” in vars(): most_rated_movies = sqlContext.table(“most_rated_movies”).rdd. takeSample(True, 10) for i in range(0, len(most_rated_movies)): dbutils.widgets.dropdown(“movie_%i” % i, “5” , [“1” , “2” , “3” , “4” , “5”], most_rated_movies[i].name) 18
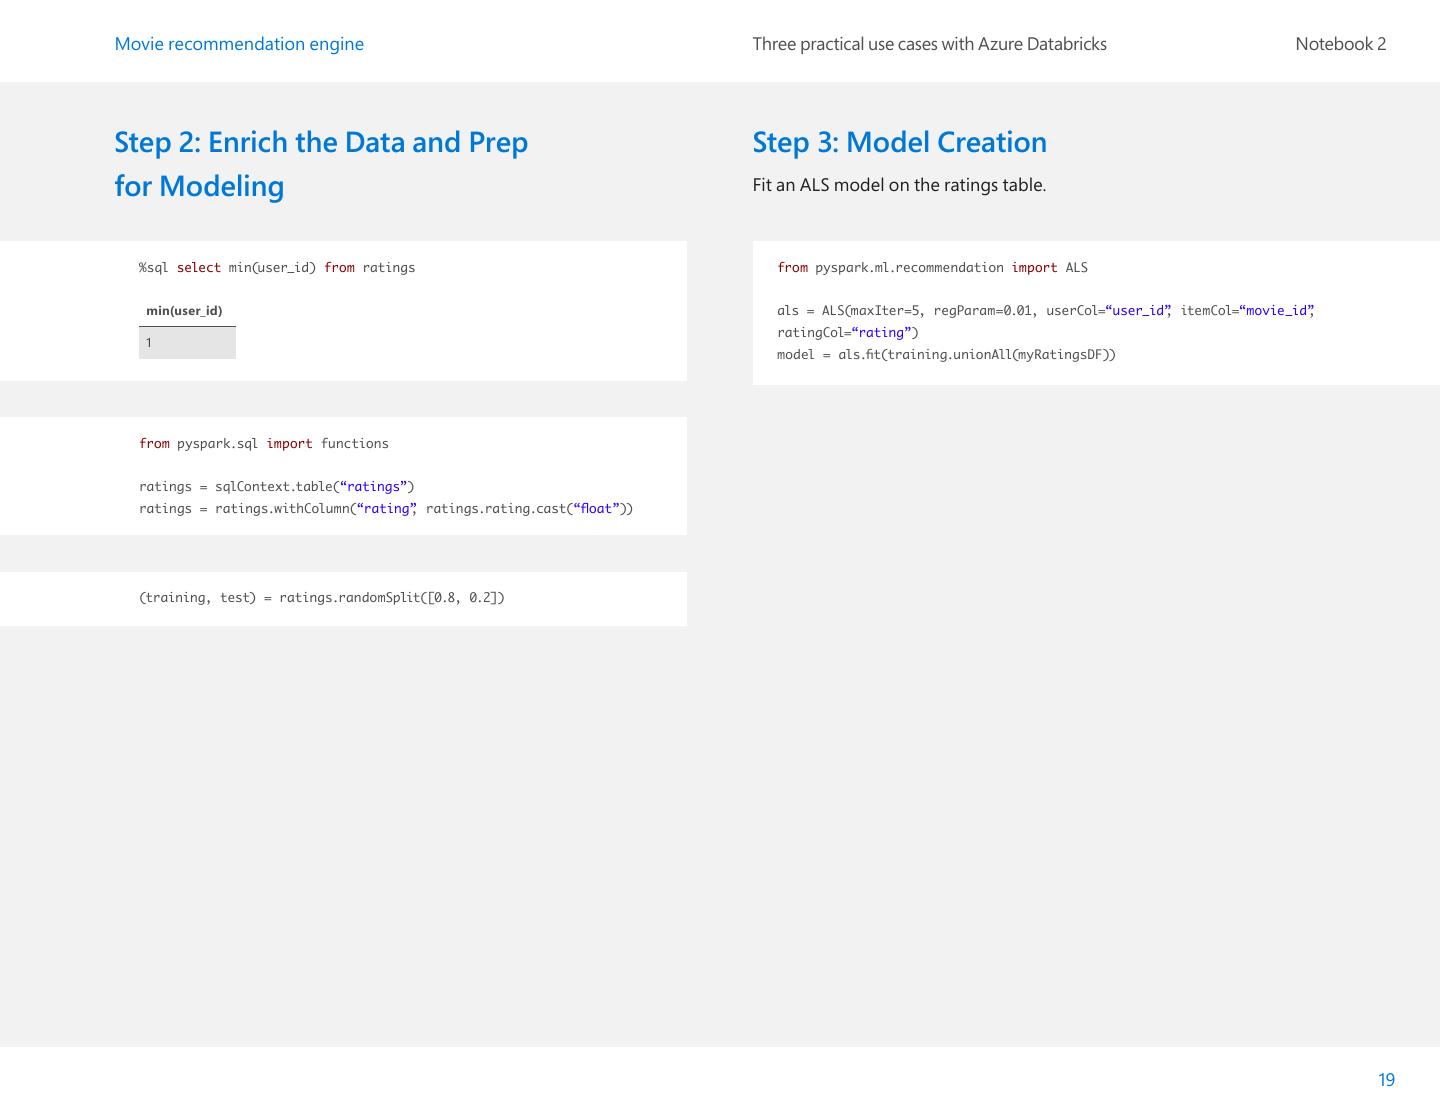
19 .Movie recommendation engine Three practical use cases with Azure Databricks Notebook 2 Step 2: Enrich the Data and Prep Step 3: Model Creation for Modeling Fit an ALS model on the ratings table. %sql select min(user_id) from ratings from pyspark.ml.recommendation import ALS min(user_id) als = ALS(maxIter=5, regParam=0.01, userCol=“user_id” , itemCol=“movie_id” , ratingCol=“rating”) 1 model = als.fit(training.unionAll(myRatingsDF)) from pyspark.sql import functions ratings = sqlContext.table(“ratings”) ratings = ratings.withColumn(“rating” , ratings.rating.cast(“float”)) (training, test) = ratings.randomSplit([0.8, 0.2]) 19
20 .Movie recommendation engine Three practical use cases with Azure Databricks Notebook 2 Step 4: Model Evaluation rmse = evaluator.evaluate(predictions) Evaluate the model by computing Root Mean Square error on the test set. displayHTML(“<h4>The Root-mean-square error is %s</h4>” % str(rmse)) predictions = model.transform(test).dropna() predictions.registerTempTable(“predictions”) The Root-mean-square error is 0.897631907219 %sql select user_id, movie_id, rating, prediction from predictions user_id movie_id rating prediction 4227 148 2 2.6070688 1242 148 3 2.5327067 1069 148 2 3.8583977 2507 148 4 3.8449543 53 148 5 3.940087 216 148 2 2.2447278 2456 148 2 3.5586698 4169 463 2 2.7173512 4040 463 1 2.1891994 from pyspark.ml.evaluation import RegressionEvaluator evaluator = RegressionEvaluator(metricName=“rmse” , labelCol=“rating” , predictionCol=“prediction”) 20
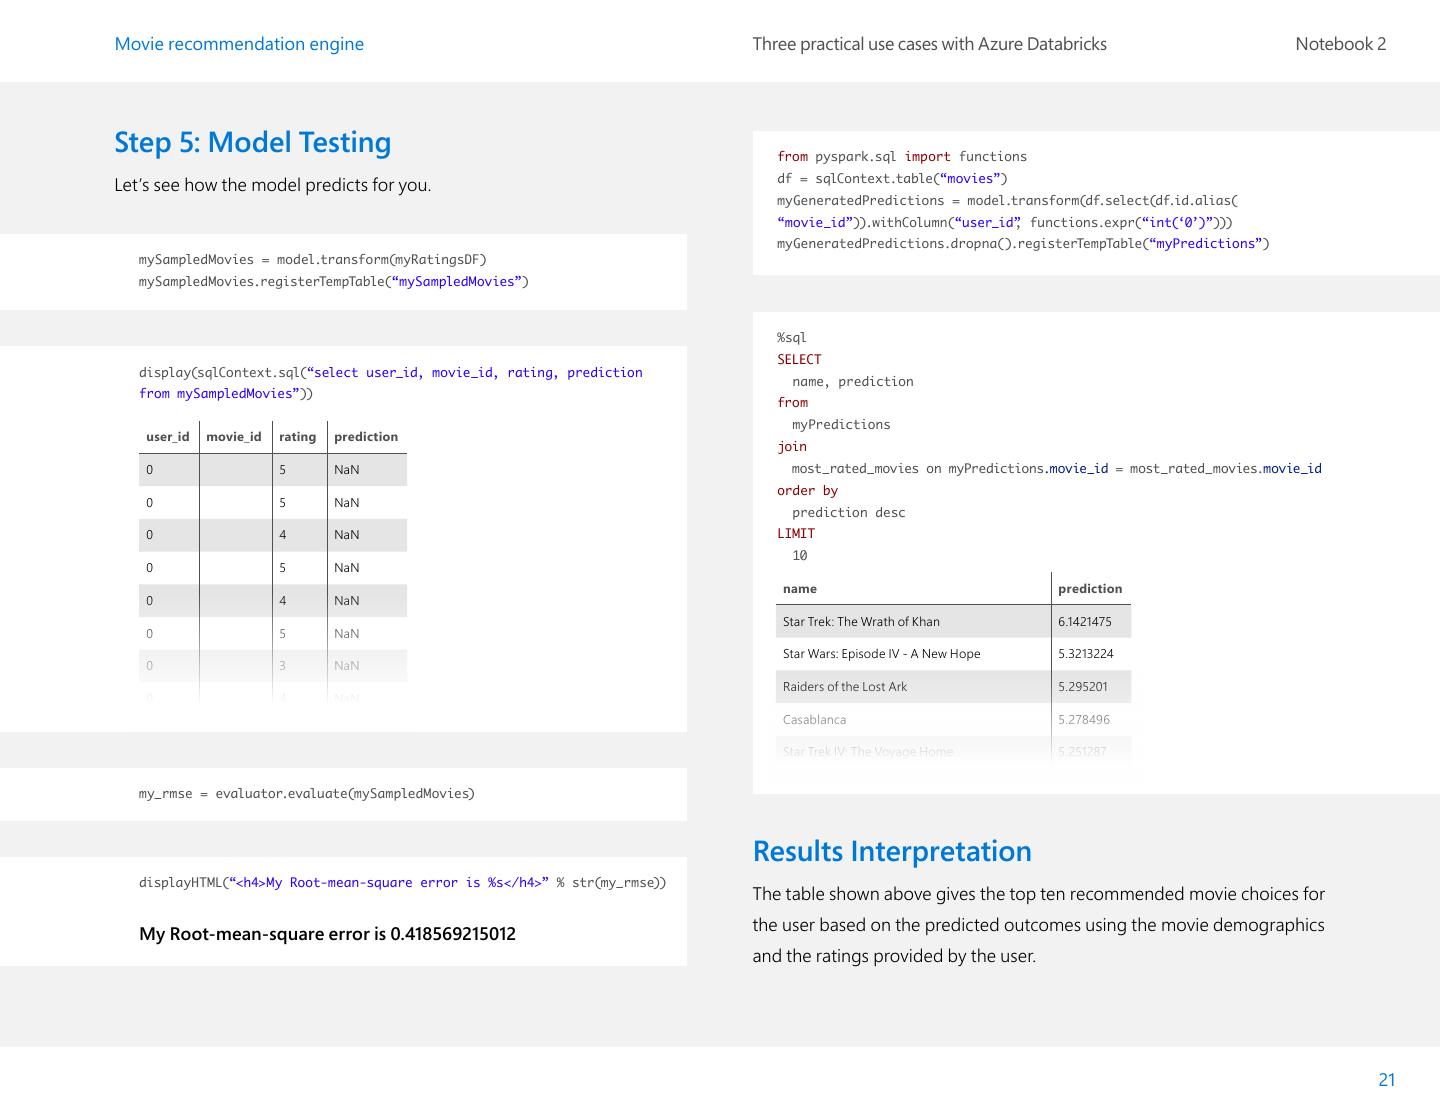
21 .Movie recommendation engine Three practical use cases with Azure Databricks Notebook 2 Step 5: Model Testing from pyspark.sql import functions df = sqlContext.table(“movies”) Let’s see how the model predicts for you. myGeneratedPredictions = model.transform(df.select(df.id.alias( “movie_id”)).withColumn(“user_id” , functions.expr(“int(‘0’)”))) myGeneratedPredictions.dropna().registerTempTable(“myPredictions”) mySampledMovies = model.transform(myRatingsDF) mySampledMovies.registerTempTable(“mySampledMovies”) %sql SELECT display(sqlContext.sql(“select user_id, movie_id, rating, prediction name, prediction from mySampledMovies”)) from myPredictions user_id movie_id rating prediction join 0 5 NaN most_rated_movies on myPredictions.movie_id = most_rated_movies.movie_id order by 0 5 NaN prediction desc 0 4 NaN LIMIT 10 0 5 NaN name prediction 0 4 NaN Star Trek: The Wrath of Khan 6.1421475 0 5 NaN Star Wars: Episode IV - A New Hope 5.3213224 0 3 NaN Raiders of the Lost Ark 5.295201 0 4 NaN Casablanca 5.278496 Star Trek IV: The Voyage Home 5.251287 my_rmse = evaluator.evaluate(mySampledMovies) Results Interpretation displayHTML(“<h4>My Root-mean-square error is %s</h4>” % str(my_rmse)) The table shown above gives the top ten recommended movie choices for My Root-mean-square error is 0.418569215012 the user based on the predicted outcomes using the movie demographics and the ratings provided by the user. 21
22 . Three practical use cases with Azure Databricks Notebook 3 Intrusion detection system demo
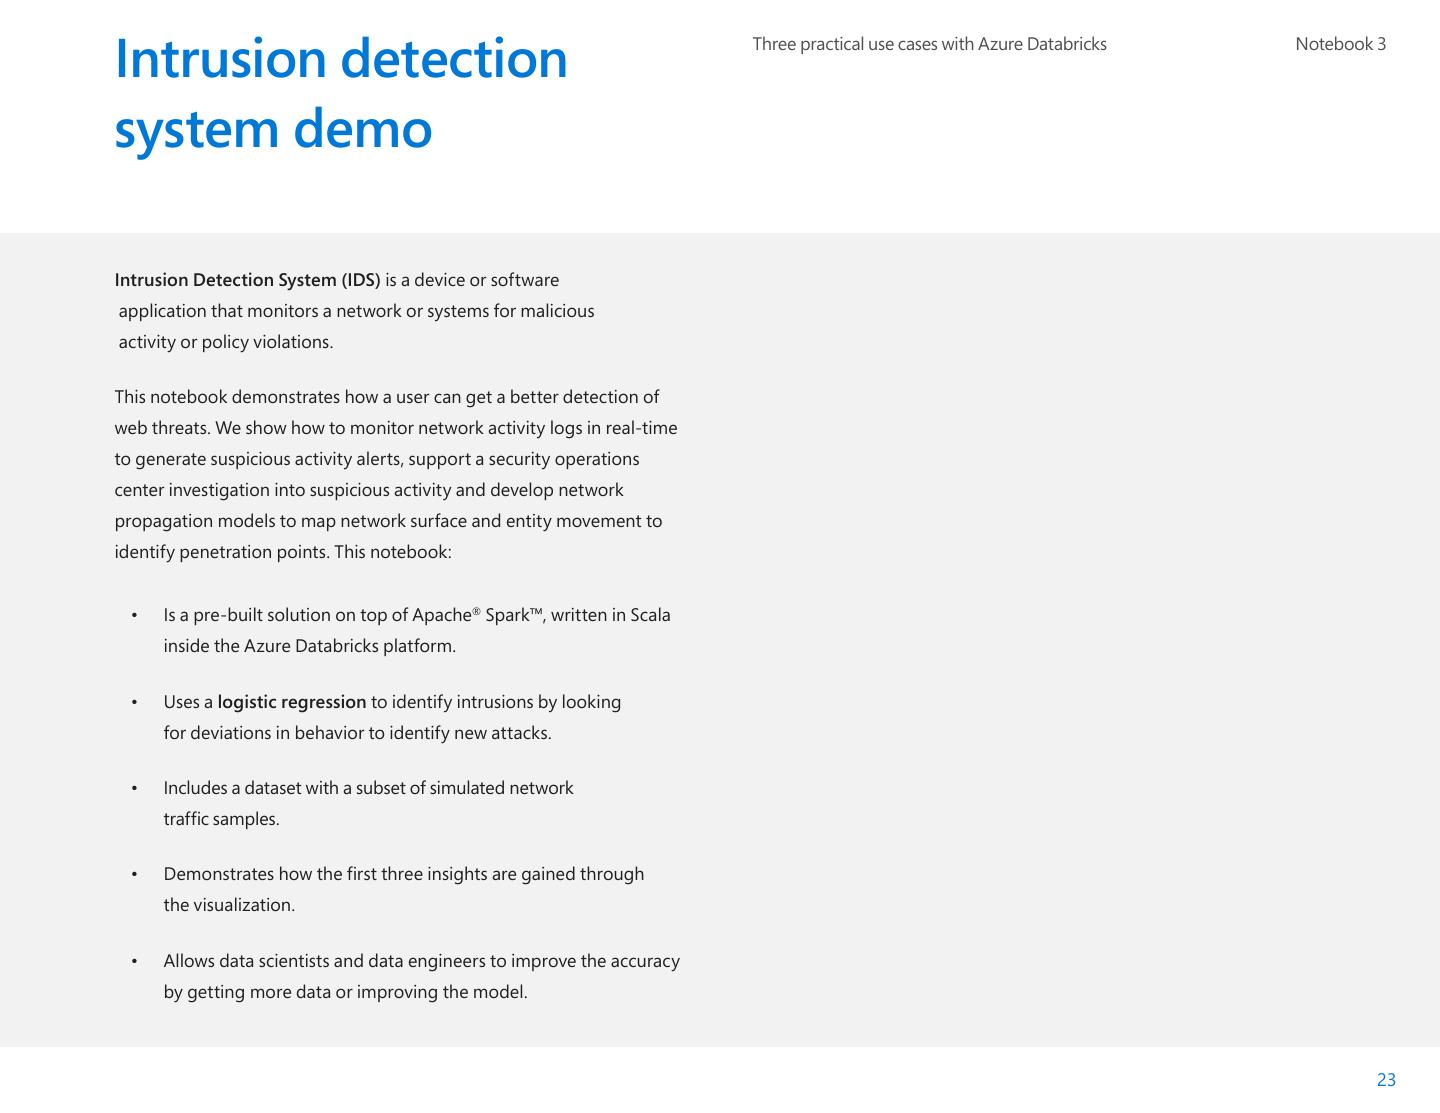
23 .Intrusion detection Three practical use cases with Azure Databricks Notebook 3 system demo Intrusion Detection System (IDS) is a device or software application that monitors a network or systems for malicious activity or policy violations. This notebook demonstrates how a user can get a better detection of web threats. We show how to monitor network activity logs in real-time to generate suspicious activity alerts, support a security operations center investigation into suspicious activity and develop network propagation models to map network surface and entity movement to identify penetration points. This notebook: • Is a pre-built solution on top of Apache® Spark™, written in Scala inside the Azure Databricks platform. • Uses a logistic regression to identify intrusions by looking for deviations in behavior to identify new attacks. • Includes a dataset with a subset of simulated network traffic samples. • Demonstrates how the first three insights are gained through the visualization. • Allows data scientists and data engineers to improve the accuracy by getting more data or improving the model. 23
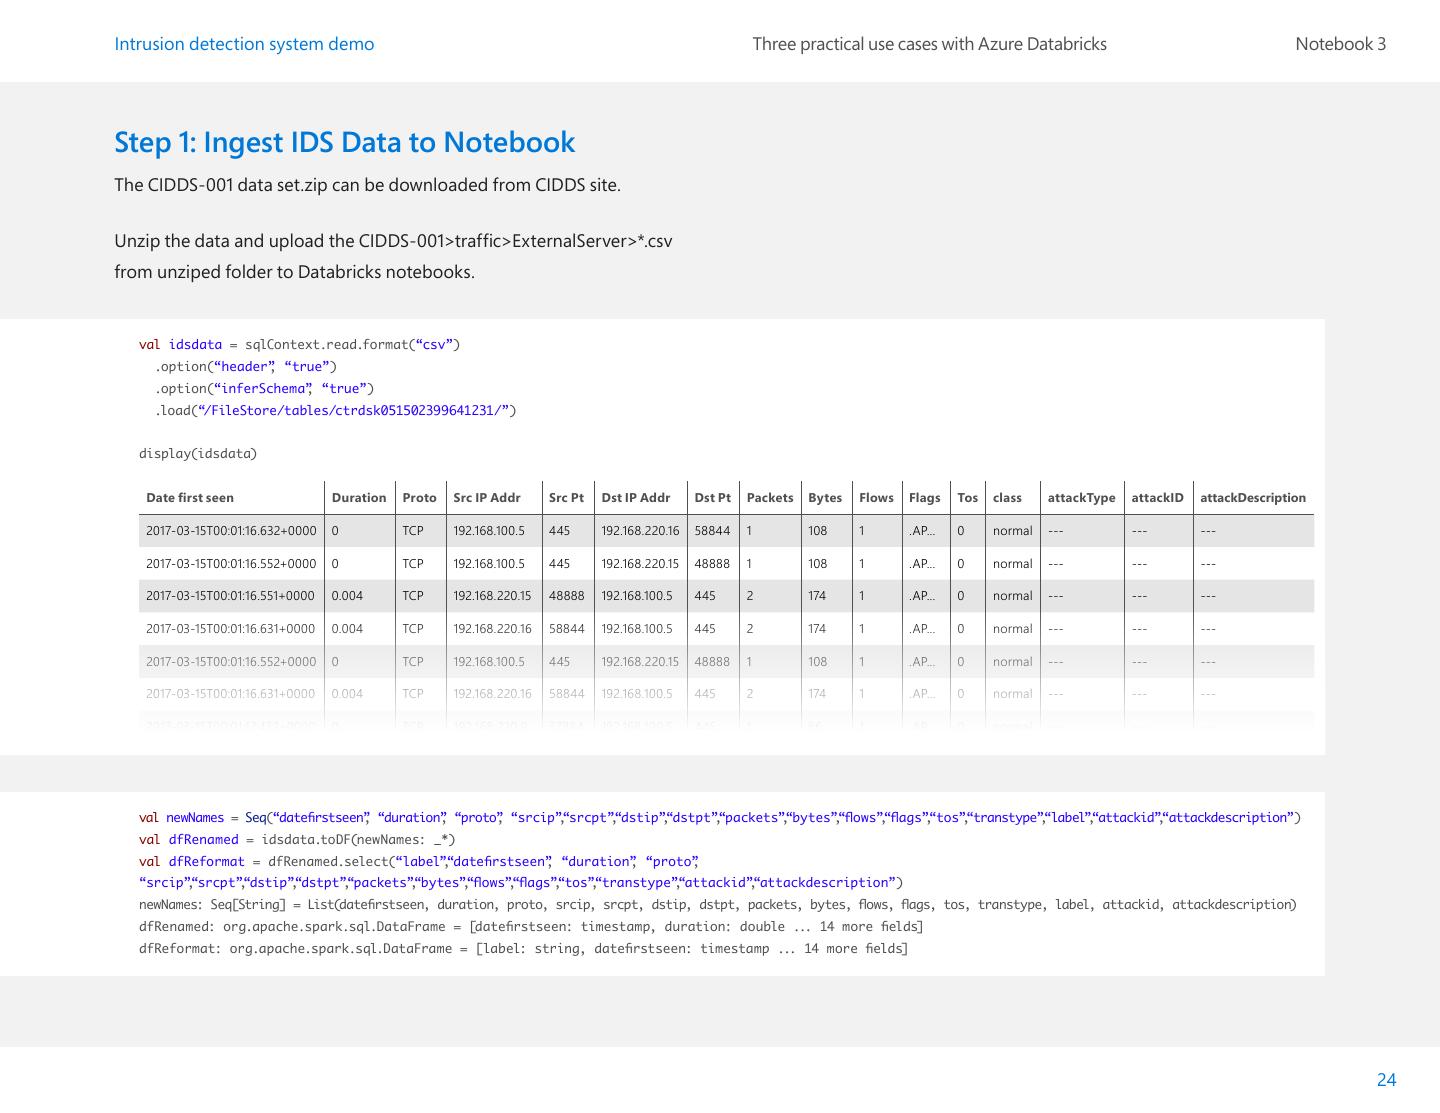
24 .Intrusion detection system demo Three practical use cases with Azure Databricks Notebook 3 Step 1: Ingest IDS Data to Notebook The CIDDS-001 data set.zip can be downloaded from CIDDS site. Unzip the data and upload the CIDDS-001>traffic>ExternalServer>*.csv from unziped folder to Databricks notebooks. val idsdata = sqlContext.read.format(“csv”) .option(“header” , “true”) .option(“inferSchema” , “true”) .load(“/FileStore/tables/ctrdsk051502399641231/”) display(idsdata) Date first seen Duration Proto Src IP Addr Src Pt Dst IP Addr Dst Pt Packets Bytes Flows Flags Tos class attackType attackID attackDescription 2017-03-15T00:01:16.632+0000 0 TCP 192.168.100.5 445 192.168.220.16 58844 1 108 1 .AP... 0 normal --- --- --- 2017-03-15T00:01:16.552+0000 0 TCP 192.168.100.5 445 192.168.220.15 48888 1 108 1 .AP... 0 normal --- --- --- 2017-03-15T00:01:16.551+0000 0.004 TCP 192.168.220.15 48888 192.168.100.5 445 2 174 1 .AP... 0 normal --- --- --- 2017-03-15T00:01:16.631+0000 0.004 TCP 192.168.220.16 58844 192.168.100.5 445 2 174 1 .AP... 0 normal --- --- --- 2017-03-15T00:01:16.552+0000 0 TCP 192.168.100.5 445 192.168.220.15 48888 1 108 1 .AP... 0 normal --- --- --- 2017-03-15T00:01:16.631+0000 0.004 TCP 192.168.220.16 58844 192.168.100.5 445 2 174 1 .AP... 0 normal --- --- --- 2017-03-15T00:01:17.432+0000 0 TCP 192.168.220.9 37884 192.168.100.5 445 1 66 1 .AP... 0 normal --- --- --- val newNames = Seq(“datefirstseen” , “duration” , “proto” , “srcip”,“srcpt”,“dstip”,“dstpt”,“packets”,“bytes”,“flows”,“flags”,“tos”,“transtype”,“label”,“attackid”,“attackdescription”) val dfRenamed = idsdata.toDF(newNames: _*) val dfReformat = dfRenamed.select(“label”,“datefirstseen” , “duration” , “proto” , “srcip”,“srcpt”,“dstip”,“dstpt”,“packets”,“bytes”,“flows”,“flags”,“tos”,“transtype”,“attackid”,“attackdescription”) newNames: Seq[String] = List(datefirstseen, duration, proto, srcip, srcpt, dstip, dstpt, packets, bytes, flows, flags, tos, transtype, label, attackid, attackdescription) dfRenamed: org.apache.spark.sql.DataFrame = [datefirstseen: timestamp, duration: double ... 14 more fields] dfReformat: org.apache.spark.sql.DataFrame = [label: string, datefirstseen: timestamp ... 14 more fields] 24
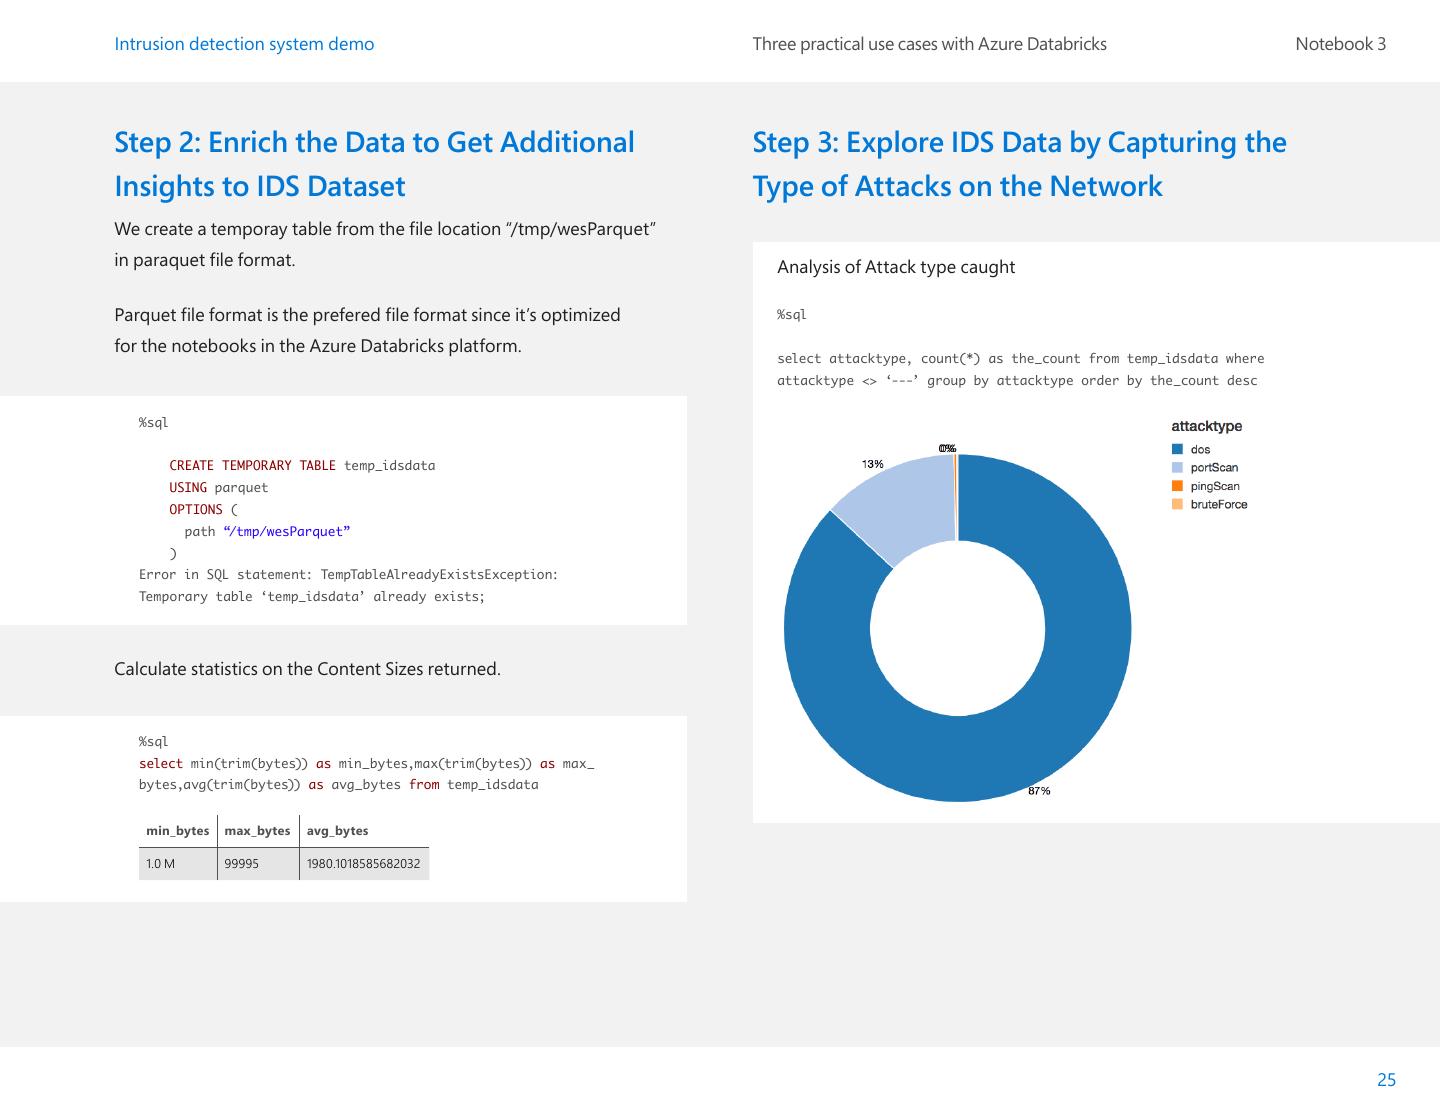
25 .Intrusion detection system demo Three practical use cases with Azure Databricks Notebook 3 Step 2: Enrich the Data to Get Additional Step 3: Explore IDS Data by Capturing the Insights to IDS Dataset Type of Attacks on the Network We create a temporay table from the file location “/tmp/wesParquet” in paraquet file format. Analysis of Attack type caught Parquet file format is the prefered file format since it’s optimized %sql for the notebooks in the Azure Databricks platform. select attacktype, count(*) as the_count from temp_idsdata where attacktype <> ‘---’ group by attacktype order by the_count desc %sql CREATE TEMPORARY TABLE temp_idsdata USING parquet OPTIONS ( path “/tmp/wesParquet” ) Error in SQL statement: TempTableAlreadyExistsException: Temporary table ‘temp_idsdata’ already exists; Calculate statistics on the Content Sizes returned. %sql select min(trim(bytes)) as min_bytes,max(trim(bytes)) as max_ bytes,avg(trim(bytes)) as avg_bytes from temp_idsdata min_bytes max_bytes avg_bytes 1.0 M 99995 1980.1018585682032 25
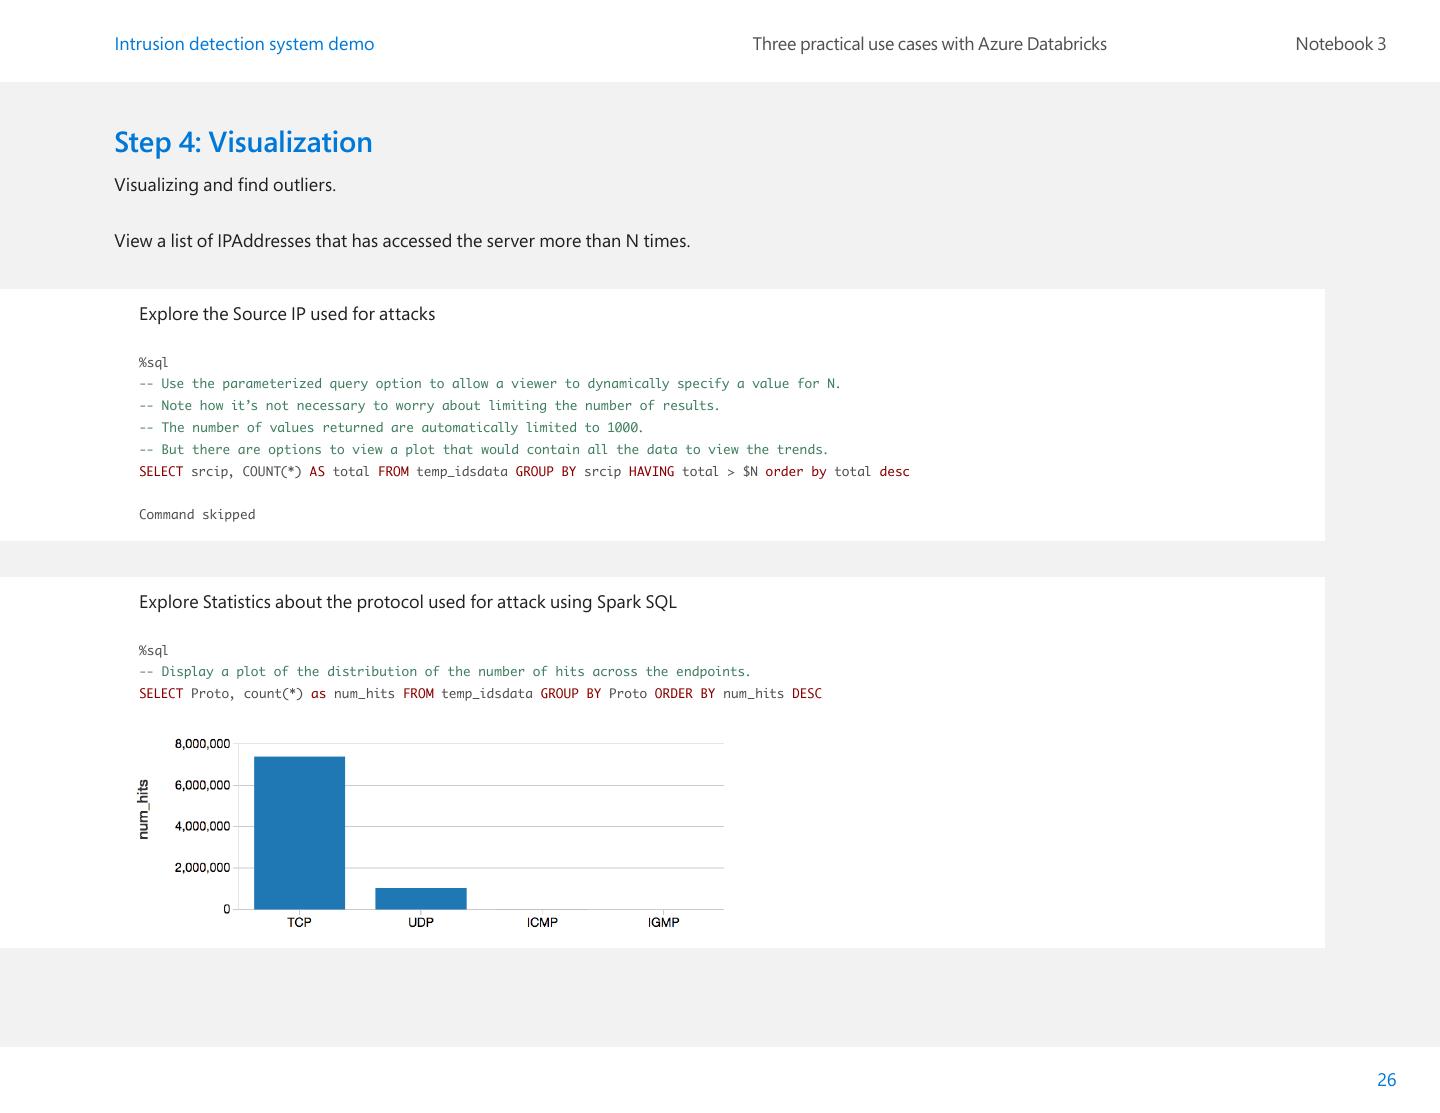
26 .Intrusion detection system demo Three practical use cases with Azure Databricks Notebook 3 Step 4: Visualization Visualizing and find outliers. View a list of IPAddresses that has accessed the server more than N times. Explore the Source IP used for attacks %sql -- Use the parameterized query option to allow a viewer to dynamically specify a value for N. -- Note how it’s not necessary to worry about limiting the number of results. -- The number of values returned are automatically limited to 1000. -- But there are options to view a plot that would contain all the data to view the trends. SELECT srcip, COUNT(*) AS total FROM temp_idsdata GROUP BY srcip HAVING total > $N order by total desc Command skipped Explore Statistics about the protocol used for attack using Spark SQL %sql -- Display a plot of the distribution of the number of hits across the endpoints. SELECT Proto, count(*) as num_hits FROM temp_idsdata GROUP BY Proto ORDER BY num_hits DESC 26
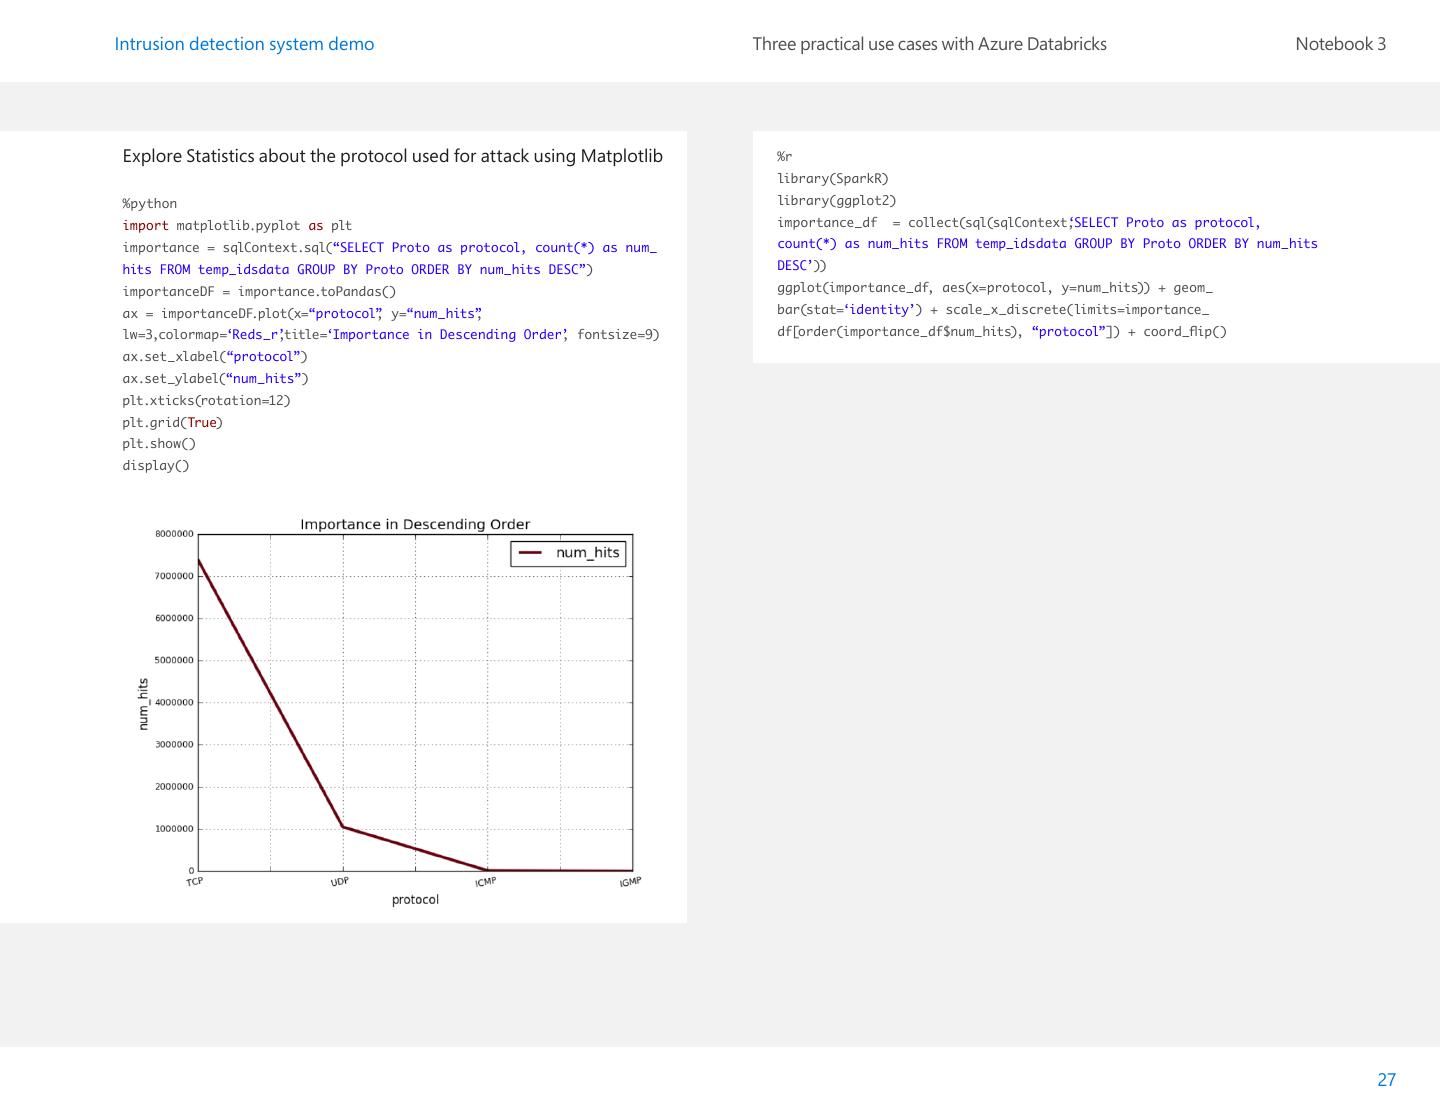
27 . Intrusion detection system demo Three practical use cases with Azure Databricks Notebook 3 Explore Statistics about the protocol used for attack using Matplotlib %r library(SparkR) %python library(ggplot2) import matplotlib.pyplot as plt importance_df = collect(sql(sqlContext, ‘SELECT Proto as protocol, importance = sqlContext.sql(“SELECT Proto as protocol, count(*) as num_ count(*) as num_hits FROM temp_idsdata GROUP BY Proto ORDER BY num_hits hits FROM temp_idsdata GROUP BY Proto ORDER BY num_hits DESC”) DESC’)) importanceDF = importance.toPandas() ggplot(importance_df, aes(x=protocol, y=num_hits)) + geom_ ax = importanceDF.plot(x=“protocol” , y=“num_hits” , bar(stat=‘identity’) + scale_x_discrete(limits=importance_ lw=3,colormap=‘Reds_r’ ,title=‘Importance in Descending Order’ , fontsize=9) df[order(importance_df$num_hits), “protocol”]) + coord_flip() ax.set_xlabel(“protocol”) ax.set_ylabel(“num_hits”) plt.xticks(rotation=12) plt.grid(True) plt.show() display() 27
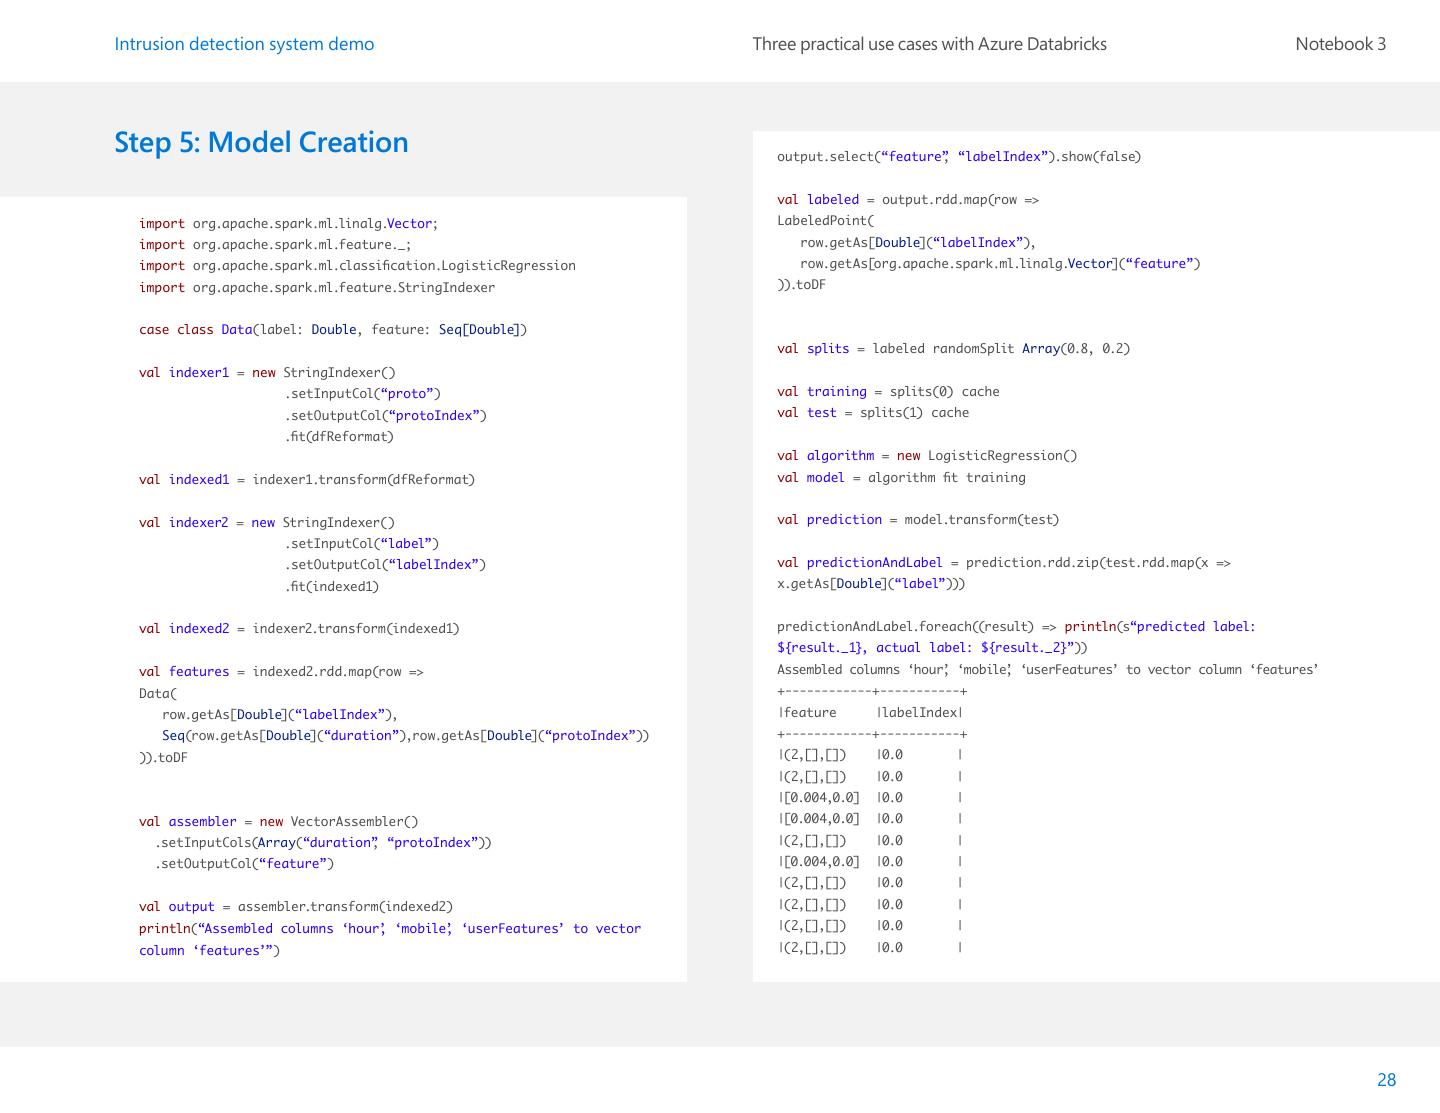
28 .Intrusion detection system demo Three practical use cases with Azure Databricks Notebook 3 Step 5: Model Creation output.select(“feature” , “labelIndex”).show(false) val labeled = output.rdd.map(row => import org.apache.spark.ml.linalg.Vector; LabeledPoint( import org.apache.spark.ml.feature._; row.getAs[Double](“labelIndex”), import org.apache.spark.ml.classification.LogisticRegression row.getAs[org.apache.spark.ml.linalg.Vector](“feature”) import org.apache.spark.ml.feature.StringIndexer )).toDF case class Data(label: Double, feature: Seq[Double]) val splits = labeled randomSplit Array(0.8, 0.2) val indexer1 = new StringIndexer() .setInputCol(“proto”) val training = splits(0) cache .setOutputCol(“protoIndex”) val test = splits(1) cache .fit(dfReformat) val algorithm = new LogisticRegression() val indexed1 = indexer1.transform(dfReformat) val model = algorithm fit training val indexer2 = new StringIndexer() val prediction = model.transform(test) .setInputCol(“label”) .setOutputCol(“labelIndex”) val predictionAndLabel = prediction.rdd.zip(test.rdd.map(x => .fit(indexed1) x.getAs[Double](“label”))) val indexed2 = indexer2.transform(indexed1) predictionAndLabel.foreach((result) => println(s“predicted label: ${result._1}, actual label: ${result._2}”)) val features = indexed2.rdd.map(row => Assembled columns ‘hour’ , ‘mobile’ , ‘userFeatures’ to vector column ‘features’ Data( +------------+-----------+ row.getAs[Double](“labelIndex”), |feature |labelIndex| Seq(row.getAs[Double](“duration”),row.getAs[Double](“protoIndex”)) +------------+-----------+ )).toDF |(2,[],[]) |0.0 | |(2,[],[]) |0.0 | |[0.004,0.0] |0.0 | val assembler = new VectorAssembler() |[0.004,0.0] |0.0 | .setInputCols(Array(“duration” , “protoIndex”)) |(2,[],[]) |0.0 | .setOutputCol(“feature”) |[0.004,0.0] |0.0 | |(2,[],[]) |0.0 | val output = assembler.transform(indexed2) |(2,[],[]) |0.0 | println(“Assembled columns ‘hour’ , ‘mobile’ , ‘userFeatures’ to vector |(2,[],[]) |0.0 | column ‘features’”) |(2,[],[]) |0.0 | 28
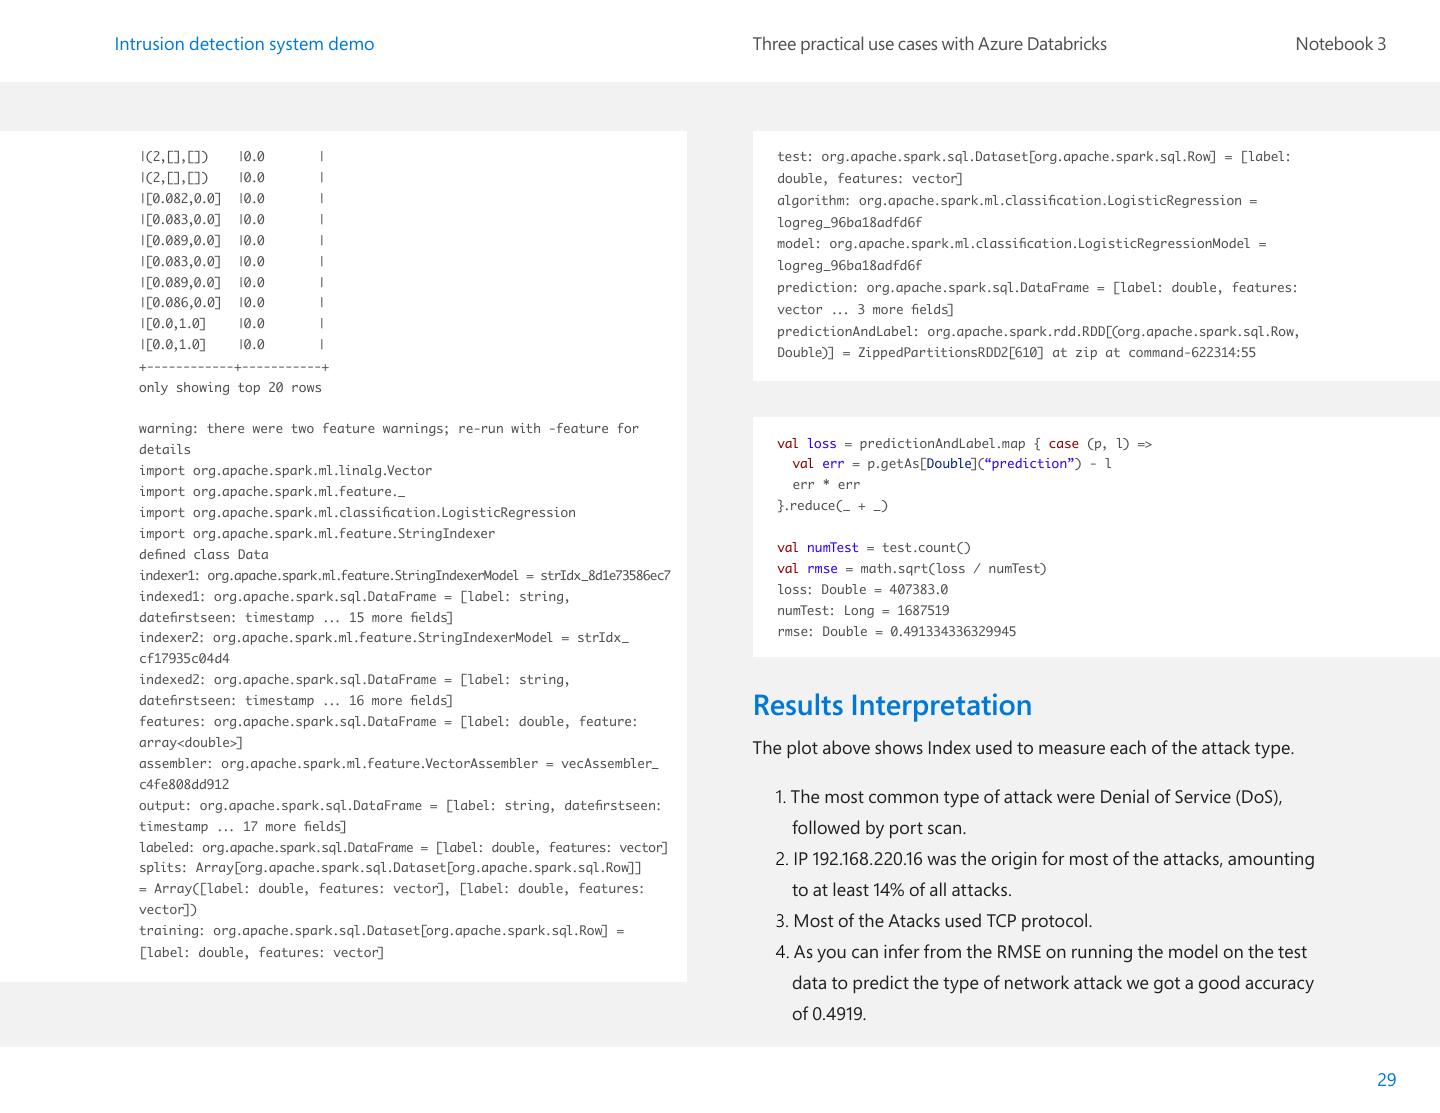
29 .Intrusion detection system demo Three practical use cases with Azure Databricks Notebook 3 |(2,[],[]) |0.0 | test: org.apache.spark.sql.Dataset[org.apache.spark.sql.Row] = [label: |(2,[],[]) |0.0 | double, features: vector] |[0.082,0.0] |0.0 | algorithm: org.apache.spark.ml.classification.LogisticRegression = |[0.083,0.0] |0.0 | logreg_96ba18adfd6f |[0.089,0.0] |0.0 | model: org.apache.spark.ml.classification.LogisticRegressionModel = |[0.083,0.0] |0.0 | logreg_96ba18adfd6f |[0.089,0.0] |0.0 | prediction: org.apache.spark.sql.DataFrame = [label: double, features: |[0.086,0.0] |0.0 | vector ... 3 more fields] |[0.0,1.0] |0.0 | predictionAndLabel: org.apache.spark.rdd.RDD[(org.apache.spark.sql.Row, |[0.0,1.0] |0.0 | Double)] = ZippedPartitionsRDD2[610] at zip at command-622314:55 +------------+-----------+ only showing top 20 rows warning: there were two feature warnings; re-run with -feature for val loss = predictionAndLabel.map { case (p, l) => details val err = p.getAs[Double](“prediction”) - l import org.apache.spark.ml.linalg.Vector err * err import org.apache.spark.ml.feature._ }.reduce(_ + _) import org.apache.spark.ml.classification.LogisticRegression import org.apache.spark.ml.feature.StringIndexer val numTest = test.count() defined class Data val rmse = math.sqrt(loss / numTest) indexer1: org.apache.spark.ml.feature.StringIndexerModel = strIdx_8d1e73586ec7 loss: Double = 407383.0 indexed1: org.apache.spark.sql.DataFrame = [label: string, numTest: Long = 1687519 datefirstseen: timestamp ... 15 more fields] rmse: Double = 0.491334336329945 indexer2: org.apache.spark.ml.feature.StringIndexerModel = strIdx_ cf17935c04d4 indexed2: org.apache.spark.sql.DataFrame = [label: string, datefirstseen: timestamp ... 16 more fields] features: org.apache.spark.sql.DataFrame = [label: double, feature: Results Interpretation array<double>] The plot above shows Index used to measure each of the attack type. assembler: org.apache.spark.ml.feature.VectorAssembler = vecAssembler_ c4fe808dd912 output: org.apache.spark.sql.DataFrame = [label: string, datefirstseen: 1. The most common type of attack were Denial of Service (DoS), timestamp ... 17 more fields] followed by port scan. labeled: org.apache.spark.sql.DataFrame = [label: double, features: vector] splits: Array[org.apache.spark.sql.Dataset[org.apache.spark.sql.Row]] 2. IP 192.168.220.16 was the origin for most of the attacks, amounting = Array([label: double, features: vector], [label: double, features: to at least 14% of all attacks. vector]) training: org.apache.spark.sql.Dataset[org.apache.spark.sql.Row] = 3. Most of the Atacks used TCP protocol. [label: double, features: vector] 4. As you can infer from the RMSE on running the model on the test data to predict the type of network attack we got a good accuracy of 0.4919. 29


